Showing posts with label canning. Show all posts

Sunday, September 21, 2014

Preserving Soap Nut Liquid

I started using soap nuts last spring when I was fighting a nasty battle with the yeast in my daughters' cloth diapers.  I'd been cloth diapering for nearly seven years without ever having this problem.  Everything I used to strip the diapers of the yeast and get rid of the horrific yeast rashes on my girls wasn't working.  Someone recommended washing them with soap nuts and at that point I was willing to try anything.  I did it and haven't turned back.  In fact, I loved them so much I started using them for all of our laundry.

Soap nuts are actually berries that grow on trees native to India and Nepal.  These berries contain saponins, making them a wonderful, natural cleanser for everything from laundry to dishes to even personal care.


Soap nut suds for the dishes

Soap nuts are also an extremely environmentally-friendly soap option because the trees they grow on do not need to be sprayed with pesticides.  The berries are naturally pest-resistant.  The soap does not contaminate water and the nuts can be composted after use.  It doesn't get much better than that!


The annoying little laundry bag

The most common way to use soap nuts in your laundry is to crack open a few, place them in a cloth bag, and toss them in with your laundry.  I have found that using them this way in my laundry creates several problems - it can be annoying to find the little baggie in the clean load of laundry and it can be difficult to determine whether or not your nuts are still creating suds.  Each nut should last through at least three loads of laundry, but I have found that their length of use is dependent on which cycle you are using on your machine.  Cloth diapers, for example, typically have an extra rinse, so if I do not fish the baggie out between the wash and rinse cycles the nuts will be exposed to water again and lose more of their strength.

To fix these issues I decided to make my own concentrated soap nut liquid.  But this liquid can spoil, so I had to figure out a way to preserve it.  Many people freeze their liquid in ice cube trays and throw a few in each load, but with limited freezer space in my house (and a slight canning addiction) I figured canning would be a better option.

Here's how I do it:

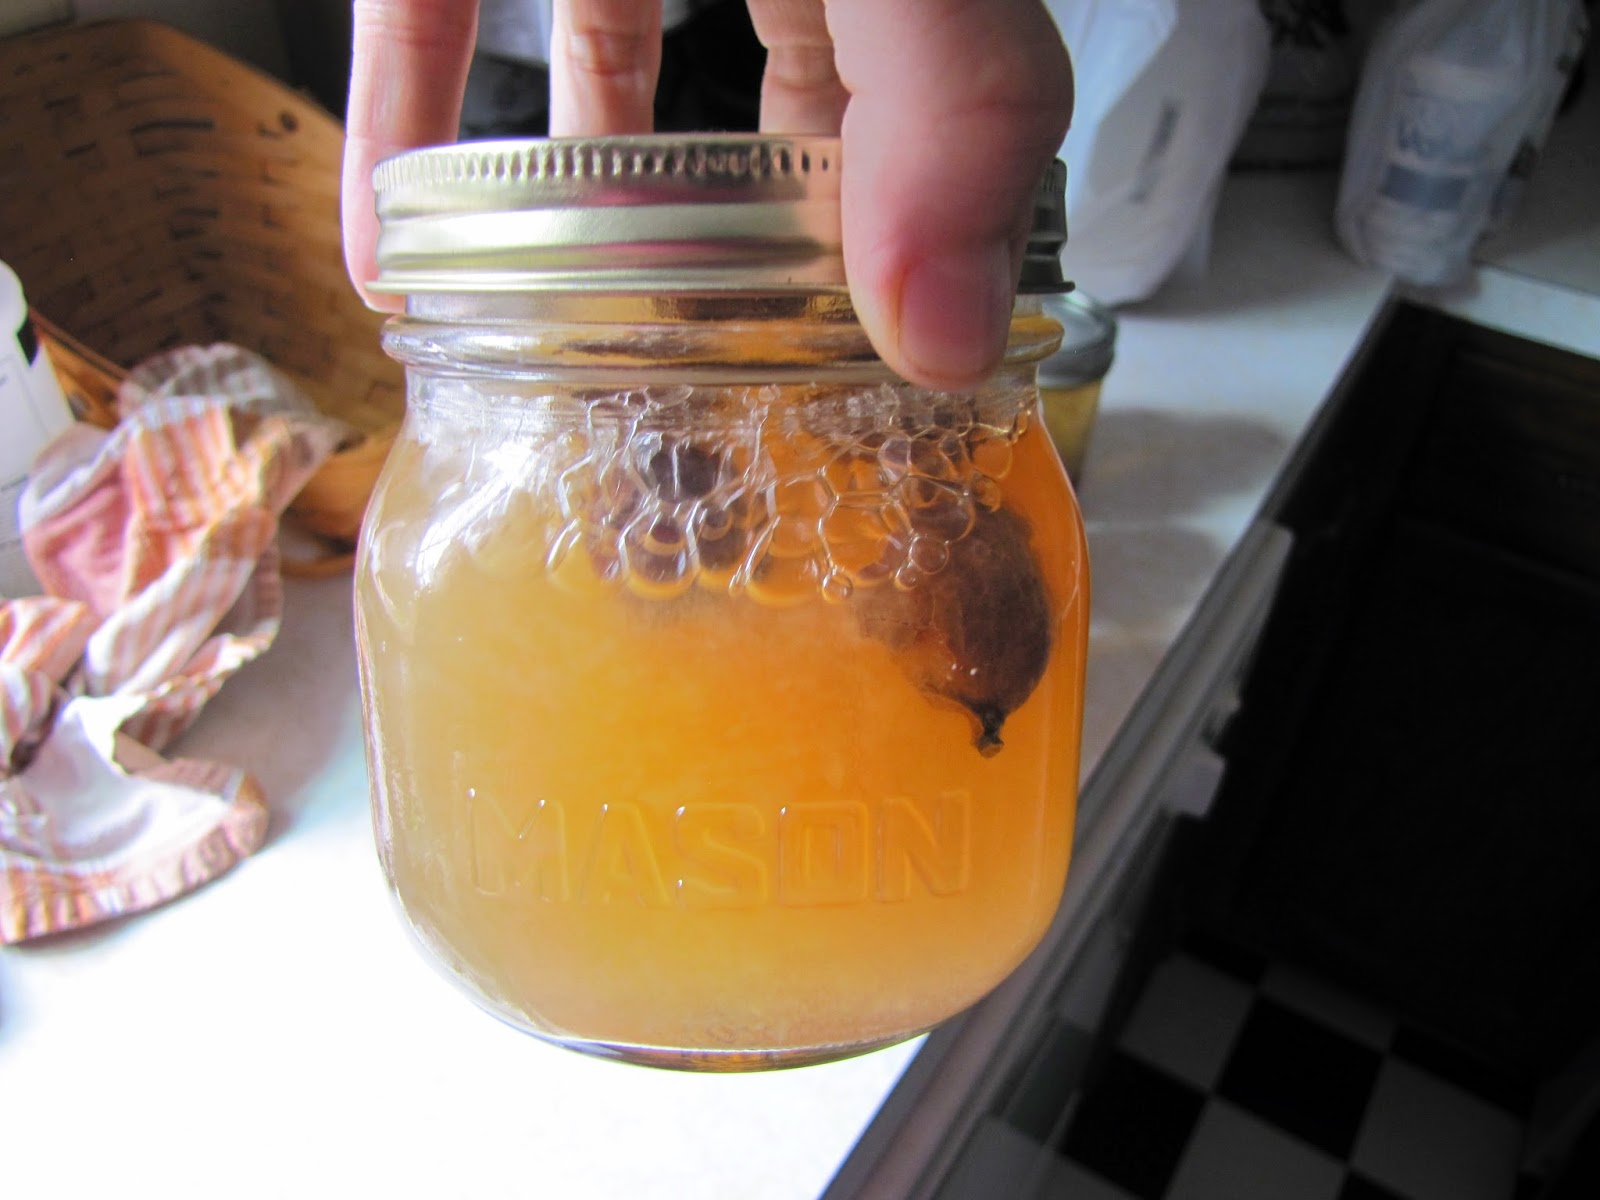
I use smaller jars - pints or half-pints - since the liquid can spoil.  Each half-pint will get me about three loads worth of soap, so with a family of six that cloth diapers I can easily use that up before it spoils.  I place 2-4 cracked nuts in the bottom of each jar.


Next I fill the jars with water.


Process in the pressure canner for 15 minutes on 10 psi or the water bath for 30 minutes and you have your liquid soap.


It's that easy!  


When I open a new jar I strain it into a different jar and then throw the cooked nuts into the compost.


A few things to note about the soap:

*I use approximately 1/4 cup liquid per load of laundry.  

*The soap itself is nearly scentless.  If I had to describe the smell it would be slightly fruity, but none of it remains on the clothing.  If you like scented laundry soap you could add a few drops of essential oil to the liquid after you open the jar.

*I have not had any issues with staining clothing, but when I do a load of whites I make sure to add the liquid to the water instead of just throwing it directly on the clothing.

*I use vinegar as a fabric softener and have not had any issues with it combined with the soap nut liquid.

*If I open a jar and am not going to use it within a few days I will put it in the fridge.  I'm not quite sure how long it would last in there before spoiling, but I've used some after a week and it was fine.


The laundry cabinet

If you're looking for a cheap, environmentally-friendly, and gentle cleanser I would definitely try out soap nuts!  My next experiment will be using the liquid as a shampoo.  I'll be sure to share how it goes.

God bless!

Jessica

Wednesday, April 23, 2014

In Defense of Home Canning


In a perfect world we would all eat 100% live food all of the time.  Everything would be raw and free from bacteria that make us sick.  Fruits and veggies would be abundant every season of the year and wild game (that isn't feeding of off GMO crops) would be right outside of our back door for us to consume whenever we need it.

Obviously, we do not live in a perfect world.  Food-borne illness exists.  Seasons change, making it impossible to grow fruits and veggies at times.  Modernization and industrialization have changed our environment and the way we have to grow and preserve food.

Our ancestors had many different ways to deal with these problems.  Some of them were nomadic and moved with the changing seasons so that fresh fruits and veggies would always be available no matter where they were.  Others stayed put through the harsh winters and relied on traditional methods of preserving food in order to survive through "hibernation".  Most of them, though, resigned to only eating what is in-season and available locally for them.  If that means you only ate apples in the fall or berries in the spring, that's the way it had to be.

Thankfully, through time, new methods of food preservation have evolved and we're not forced to let the season determine our menus.  While the tried and true methods of lacto-fermentation, smoking, and drying food will always be best, they are not always convenient or possible for everyone.  Freezers and canning methods are the solution for those people.  Some will look at these methods of preservation and say that because they are new and not what our ancestors used they are unhealthy, un"primal", or "processed", but I argue that just because it's new, it doesn't necessarily mean it's bad or evil.  Not everything that is "processed" is the equivalent of a Twinkie, and in fact, the processing can make some foods even healthier for us to digest.

Why Preserve Food?

Environmental responsibility is just as important as the food we put into our bodies, mainly because it affects what we put into our bodies in the long-run.  Because there are changing seasons, many areas of the world are unable to grow fresh produce for a large part of the year.  In order to get their required nutrition, people living in these areas need to either preserve foods when they are in season or have fresh foods shipped to them from other parts of the world when they are out of season.  Preserving the food while in season so it can be eaten throughout the year is the more environmentally responsible option.  On top of that, it is better for your local economy, as you're supporting local farmers during their growing seasons by buying their products in bulk instead of supporting farmers overseas throughout the rest of the year.

Frozen or Canned

There are many people who are very anti-canned foods, because they feel canning leaves the food dead and denatured.  These people will, however, rely on freezers to preserve their foods.  While canning does create a sterile, dead food (void of both bad AND good bacteria), it does not mean the food is entirely denatured.  My purpose in this post is to show you how and why.

I would also argue that while freezing is a wonderful method of preservation, it also, technically, creates processed food, and simply isn't practical for the average family to practice for ALL foods.  In my family of six, it can take hundreds of quarts of canned applesauce from apple season in order to provide enough for us to eat just 2-3 times a week during the off-season.  Just the applesauce alone would require an entire chest freezer for preservation.  If you're a family that also buys your local, pastured meat in bulk, preserves many different varieties of foods other than applesauce, or perhaps has a breastfeeding infant that requires pumped milk, freezer space is precious and not readily available for bulk food preservation.  A solution could be to buy multiple freezers, but once again, environmental responsibility is just as important as the food we consume.  Freezers use a lot of energy.

While canning does create a sterile, dead food (void of living bacteria - both good and bad), it does not mean the food is entirely denatured.  We have to make choices about how we preserve food based on the amount of space we have, what the heating process does to the specific food, and what is best for the environment.

What does the canning process do to the nutrients in food?

Studies have shown that there are both good and bad things that happen to the nutrients in foods that are canned.  Vitamin C is lost during the canning process, but what little remains afterwards is stable throughout storage.  The same for many of the B Vitamins.  During the freezing process, on the other hand, very little of these nutrients are lost during blanching, but they are not stable during storage due to oxidation.  Frozen produce consumed within a month is going to be more nutritious than if it was stored in the freezer for six months, whereas the nutrients in canned foods will remain stable throughout the shelf-life of the food.  So a year after preservation, the canned food will usually be more nutrient dense than the frozen food, depending on moisture levels and the temperature of the freezer, of course.

On the other hand, the canning process opens up the cell walls of fruit flesh, making things like Vitamin A and carotenes more readily available.  Very few of these nutrients are lost during the canning process, and in the case of things like tomatoes, the carotenes, like lycopene, will actually increase.  Freezing produce, however, does not cause an increase in nutrients, with the exception of things like peaches where freezing yields 21 times more Vitamin C than fresh (canning yields only four times more than fresh - but the canned peaches have more Vitamin E than both frozen and fresh).

Fiber is another thing to consider when canning.  The high heat does not affect fiber content, but rather makes it more soluble and useful to the body.  Freezing does not do this.

The bottom line is this - both methods of preservation have their pros and cons.  Canning creates a sterile, dead food that in some cases can be lower in nutrients, but it allows for more convenient storage and does not cause long-term nutrient loss.  Freezing means less nutrient loss up front and leaves both good and bad bacteria intact, however it allows for more nutrient loss during the storage process due to oxidation.  It also takes up more room in your freezer, and preservation of the food is dependent on access to electricity.  If you've ever had a full freezer during a long-term power outage or have had a freezer door accidentally left open (like me), then you understand how inconvenient and costly this problem can be!

When to Can and When to Freeze?

Bone Broth

I've posted before about how I can my bone broths.  There are many who think this is an unwise thing to do, as the high heat of the canning process can affect your gelatin.  This is true - not all canned broth will gel afterwards.  But, that doesn't mean that there is no benefit to canned broth.

When buying processed gelatin in the store, you can usually find two types - regular gelatin powder and collagen/gelatin hydrolysate.  Gelatin powder is like the equivalent of uncanned bone broth reduced to a powder.  It will gel and create things like gummy snacks.  Collagen hydrolysate is like the equivalent of canned broth.  It is heated at a higher temperature than regular gelatin powder, which increases the number of amino acids.  While collagen hydrolysate will not gel, much like canned broth, it is better assimilated into the body.  Collagen hydrolysate is actually better for people like me, with Crohn's Disease, as it is easier on digestion.

I see benefit to both freezing and canning bone broth.  It is good to have some fresh off the stove or crockpot, some kept in your fridge for quick use, and some in either the freezer or canned for those times when you need it and don't have it fresh.  Canned broth, since already heated, is perfect for things like soups and stews.  Frozen is good for thawing and warming as a beverage.

Meat

Canning meat is one of the easiest things in the world to do.  You simply take the raw meat, chop it into little pieces, fill the jar with water, and process in the pressure canner.  When you are done you have a preserved jar of canned, pastured meat for those days when you may not have had time to thaw your meat before cooking or you need to take a meal with you somewhere.

Meat, unless you're eating it raw, is going to lose nutrition through preparation regardless of the method.  Canning the meat brings it to a temperature of 240 degrees for a few hours and then allows all nutrients to remain stable throughout storage.  You may end up cooking fresh or frozen meat at the same or higher temperature, losing the same nutrients.  Canning will render the meat sterile, whereas cooked meat can quickly lead to food-borne illness if not handled and preserved properly after it is taken off of the heat.

For some meats, such as fish, the canning process will actually increase nutrition.  The high heat causes bones in fish meat to leach calcium into the meat.

Vegetables

Let's face it, canned veggies often don't taste as good as fresh or frozen.  Green beans, for example, can end up mushy.  And the longer the jars sit in storage, the worse the flavor seems to be.

But some veggies, like leafy greens, actually benefit from the heat.  Spinach that sits in your fridge can lose nearly all of its nutrient content in one week (that doesn't count the 2-3 weeks it can take for it to get to your fridge from the farm during winter).  Cooked spinach increases iron, protein, fiber, zinc, thiamine, and calcium; and has higher amounts of vitamins A and E.  Spinach that is picked ripe and canned immediately will have much more nutrition than store-bought spinach that you bring home and immediately use up, and way more than spinach that sits in your fridge for a week longer.

With any veggies, if you're worried about nutrient loss during the canning process, remember that most of what is lost ends up in the cooking liquid.  Since canned veggies are only really good in cooked foods like stews or soups, it is best to use the liquid from your jars in the soups in order to increase nutrition and make up for what was lost in the veggie itself.


A 2005 Dutch study suggested that canning fruits and vegetables decreases glucosinolate content - a phytochemical that may fight cancer and memory loss.  Glucosinolates are primarily found in cruciferous veggies like cabbage or broccoli. Since broccoli is high in Vitamin C, it is not recommended that you can for preservation.  And cabbage is best preserved through lacto-fermentation as sauerkraut.  To benefit from the protection of glucosinolates, just preserve the foods high in them with other methods and serve them as a side with your home-canned foods that lack them.


Fruits

As is the case with broccoli, it is best not to can fruits that are high in Vitamin C.

Some people have luck canning pumpkin, although I have never tried.  Canned pumpkin has 30 times more vitamin A than raw pumpkin and 20 times more than fresh-cooked.

Other fruits, such as apples, provide fiber as their benefit.  Since the canning process does not affect fiber, and actually enables better digestion, apples are one fruit that is best preserved through canning.  You could argue that it would be best to freeze applesauce, as not to make it a dead food, but the heating process used to create the applesauce itself has already rendered it dead.  Freezing will not make it live again.  Canning will free up freezer space for items that cannot be preserved through canning, such as squash and citrus fruit, and allow you to buy apples in bulk during the growing season.

Fruits such as berries are best when frozen if you're looking to consume them for nutrition, but since they aren't a main source of vitamin C to begin with, canning will not make much of a difference.  It is nice to have some frozen berries to enjoy in things like smoothies for a nutrient punch, with some canned berry jams in the cupboards to use as condiments and for flavor.

As mentioned above, always can your tomatoes instead of freezing, as the process increases the amount of lycopene in the fruit.

Conclusion

All food methods have benefits.  When you're looking at 15 bushels of fresh apples, it would be impossible to freeze it all.  Dehydrate some into chips.  Freeze some for baking.  Can some applesauce.

When you get your full beef you can dehydrate or smoke some for jerky.  Can some for a convenient meal later.  Freeze the rest to enjoy throughout the year.


Unfortunately, we can't always forage and hunt for the freshest of foods.  We have to make sacrifices in order to be able to live in the modern world.  Raw, live foods are rare and when they are plentiful, they are rarely safe when eaten raw.  Even most of the "raw" almonds you find in the store are irradiated and left dead.  It's the unfortunate consequence of desiring almonds when you don't live in almond country.  In order for to food to get to our doors year-round, whenever we're craving them, they have to be made safe for transport.  The same will be true when you're desiring berries in the winter or bananas in the North.

Don't let your fear of eating "dead" foods (in moderation) keep you from enjoying the art of canning your own delicious foods.  Yes, a raw egg is best for you nutritionally, but you will still eat it when it is cooked and dead, won't you?  Just because a food is canned, it doesn't mean it's not good for you.

As with any meal, it's always good to eat more live than dead foods and no one is advocating a diet consisting solely of home-canned foods.  If you decide to have some of your canned applesauce with a meal, make sure that you add some homemade yogurt or large portions of raw veggies to the meal.  If you're eating canned meat, top it with a fermented cruciferous veggie, like homemade sauerkraut.  If you're enjoying some of your homemade unsweetened berry jam with a meal, add raw, local honey to it before serving to "liven" it up.  Balancing dead foods with live ones will create a healthy, nutritious meal that is also environmentally-friendly and supports local farmers year-round.

A jar of in-season, home-canned produce is going to be more nutritious than out of season produce at the grocery store, and also better for the environment.  Period.  You also can't downplay the security in knowing that the organic, local food you worked so hard to preserve will be stable regardless of whatever happens to the power.

Finally, remember that whenever you're canning, always use proper sanitation and hygiene guidelines.  Use lids that are free of BPA and other toxins, and always make sure to dispose of any jars that show signs of seepage or spoilage.

-Jessica


Sources

http://ucce.ucdavis.edu/files/datastore/234-779.pdf

http://nutrican.fshn.uiuc.edu/studyfinal.html

Wednesday, September 11, 2013

Preserving Apples

It's that time of year again!  Pretty soon beautiful bushels of fresh, locally-grown apples will start filling every corner of my house, just waiting to be preserved.


Apple season is usually extremely busy in our household.  I spend approximately two whole weeks in the kitchen washing, peeling, coring, and preserving them because they are some of my family's favorite treats.

Did you know that even the organic apples and pears sold in the grocery store are sprayed with antibiotics?  Apples and pears are the only two foods in the United States that are allowed to be full of antibiotics and still display the organic label.  This is a huge problem that is being widely debated and the hope is that by 2016 it will no longer be allowed.  These antibiotics play a role in gut health and antibiotic resistance, so it is really important that we stop this practice, especially among organic growers.

Since apples and pears are so vulnerable to bacteria and infections that can kill the trees, it is almost impossible to grow them without spraying.  There are alternatives, but they are too costly for the average farmer.

Because of this, whenever I get my apples, regardless of the organic-labelling or not, I do a thorough washing in vinegar.  Water alone is not enough.  The vinegar will kill 98% of bacteria, pesticide residue, and anything else that may be on the peels.  Just fill your sink (sanitized with vinegar) with the apples, cover with water, and add two cups of vinegar.  Let them soak for about ten minutes (apples obviously want to float, so just make sure that you push them under and mix them around every few minutes), drain the sink, and then rinse them before eating or preserving.


Here are my essential tools for apple preservation:

Apple Peeler
Apple Corer
Large Stockpot
Large Wooden Spoon
Food Processor*
Canning Supplies (water bath canner, mason jars/lids, tongs)
Juicer
candy thermometer
Dehydrator
Freezer Bags/Containers

*some people prefer to throw their apple in with the peels and then use a food mill when they cook down.  I prefer the consistency of the applesauce when I peel them first and then puree with a food processor after they have cooked.

To can my applesauce I use my peeler to peel and core, and then throw the apples into my stockpot with a small amount of filtered water to prevent sticking.  Once the apples have cooked down a little and have softened, I run them through the food processor until they are completely pureed.  My children prefer a very smooth applesauce and this method seems to work best for obtaining the desired texture.  After it is pureed it goes back into the stockpot until it reaches a boil.  Then I fill my jars with 1/2 inch headspace and process them for twenty minutes in the water bath.

Toward the end of my preserving marathon I sometimes get lazy and stop peeling apples.  I will simply cut the apples using my corer and throw them, peels and all, into the stockpot to cook down (make sure you used the vinegar wash if you're going to do this).  When you put the apples into the food processor they will still blend down to a nice puree, but it won't be as smooth as without the peels and you will see little slices of peel in the jars.  My kids don't really notice a difference, but I definitely prefer the sauce without the peels.  We can go through 2-3 quarts of sauce each week (100+ each year), so when you're canning in those quantities you sometimes have to cut corners to get it all done!


Apple Juice is another favorite of mine.  When I get to the end of my canning session it's a really easy way to use up apples and preserve them.  I just throw my halved apples straight into our juicer (we have the Jack LaLanne) and then heat the juice that comes out to 190 degrees (I use a candy thermometer to check).  You are not supposed to boil the juice.  Once it reaches the temperature I ladle it into my jars with 1/4 inch headspace and process for ten minutes in the water bath.

If you don't have a juicer you can do it the old-fashioned way - throw your chopped apples into the stockpot with water (1 quart filtered water per 12 pounds apples) and once they have cooked down you can strain them through something like cheesecloth to get the juice.


Freezing is a wonderful way to preserve your apples.  Most canning books will tell you to treat your apples with a produce protector before freezing to prevent darkening, but I've never done it and haven't had a problem.  The frozen apples do discolor a little bit, but since you're usually using the frozen apples for things like pies and cobblers, the discoloration doesn't really matter.  My favorite use for frozen apples is in stove-top potpourri.  I throw a cup of the apple slices in a pot with some water, cinnamon sticks, whole cloves, and dehydrated mint, and put it on simmer.  The smell is amazing and a great alternative to chemical-filled candles and air-fresheners.


Dehydrating apple rings is another great way to preserve apples.  If sliced thinly enough they will turn crispy like a chip - a favorite for my children.  If the slices are a little thicker they will be somewhat chewy, but still tasty.

The best way to ensure thin slices is to use an apple peeler.  When you're done you get nice apple rings that are uniform in size and fit nicely on your dehydrator tray.  I usually fill my dehydrator in the morning and by dinner they are ready (every dehydrator is different).

I've made my apple chips both with the peels and without and they are both equally delicious.


I hope you have a wonderful apple preserving season!  There is so much you can do with this delicious fruit to ensure that you will enjoy it all through the winter months.  If you are interested in recipes for things like apple butter, apple pie filling, or other sugary treats, I've always had good luck with the Ball Blue Book.  I like to use tried and true recipes to ensure that what I make will be preserved safely.

Happy (almost) autumn everyone!  And remember - an apple a day keeps the doctor away!

-Jessica

Friday, August 23, 2013

Making and Preserving Homemade Chicken Broth

Note: People often use the terms stock and broth interchangeably. Essentially, they are the same thing - water flavored with bones, meat, and vegetables. The main difference is that broth is seasoned and stock is not. I like to flavor before preserving, therefore what I make is a broth, but if you were to leave out the flavoring, you could have a bland stock to season as needed with your recipes.

As I am reaching the height of my canning season, I am working on a series of posts about food preservation. I think the best place to start is with homemade stock.

Do you ever wonder what to do with the carcass after you roast a whole chicken? Making a bone stock or broth out of it is easy and saves you a ton of money. Throughout history bone broths have been known to have healing effects: mitigating cold symptoms, helping with inflammation, relieving digestive issues, and just giving us a sense of comfort when we're under the weather.

The most common brands of broth, like Swanson, are misleading in their advertising.  Many brands contain MSG, a neurotoxin, so Swanson wants us to know theirs is healthier and makes sure to label it as "all-natural" and "MSG-free".  The problem is that Swanson chicken broth contains yeast extract, which means the broth does in fact contain MSG.  It's a labeling trick that is dishonest.  To learn more about MSG and yeast extract, read this.

Buying a good, organic bone broth in the grocery store is difficult, not only because they are often seasoned with items you don't want, but they are pretty expensive.  Take Pacific Foods Free Range Organic Chicken Broth, which contains organic chicken broth (filtered water, organic chicken), organic chicken flavor, (organic chicken flavor, sea salt), natural chicken flavor (chicken stock, salt), organic evaporated cane juice, organic onion powder, turmeric, and organic flavor.  I don't know about you, but I have no idea what "organic flavor" is and I prefer that there isn't hidden sugar in my broth. Besides, for $4.00 per 32 ounces, I would at least like to see some veggies in the broth.

Instead of spending so much on nutritionally inferior broth, why not make your own out of something that costs you nothing extra, as you intend to throw the carcass in the garbage anyways?

All the equipment you need to make your own broth is a large stock pot, something to strain it with (like cheesecloth), and eight quart-size canning jars/lids.  I use my Cuisinart 12 Quart Pasta Pot because it allows me to throw all of my ingredients in the pasta insert and once the broth is done simmering I can pull the solids out without having to strain the broth through anything.

If you don't have a pasta insert, just throw your carcass, veggies, herbs, and seasonings straight into your stockpot and strain it when it is done.

Remember not to use a stock pot coated with Teflon or other non-stick coatings and additives.  It makes little sense to worry about your food additives while cooking with pots that contain carcinogens. 

MAKING THE BROTH
8 quarts filtered water
1 organic, free-range chicken carcass
3-4 organic carrots
3 organic green onions
2 cloves organic garlic
10-15 whole peppercorns
2 T sea salt

I do not add herbs now, because I prefer to add them directly to whatever food I am using the broth as a base for, but you could add some now if you want to - bay leaves or rosemary would be nice.

Bring the water to a boil and then let it simmer on the stove for about four hours.  If you have your solids directly in a stock pot you're going to want to stir it every now and then to make sure the veggies aren't sticking to the bottom.  If you're using the pasta insert it is not necessary.

After four hours you have a delicious broth that you can either preserve by freezing or canning, or put directly in the fridge, where it will last for about one week.  Freezing is a great option if you have the space for it, however, I prefer canning my broth so I don't waste precious space in my deep-freezer.

CANNING THE BROTH

To preserve your broth you are going to need a pressure canner.  I have a Presto 16 Quart canner and it is easy to use, although quite intimidating the first time.  If you've never used a pressure canner you may want to invite someone over to help you initially, as it is very different than using a water bath canner.

My canner fits 7 quart-size jars, and since I prepare 8 quarts of broth at once (1 inch of headspace), I leave one in the fridge for immediate use.  The rest go into the canner for 25 minutes at 10 psi.


And there you have it - 8 quarts of delicious homemade broth to use as a base in your soups and other meals.  Not only is it nutritionally superior to what you can buy in the store, but it saves you about $32 if you were buying the same quantity of organic broth there.

In case you're wondering, you CANNOT preserve broth with a water bath canner.  It is a low-acid food, which needs to reach 240 degrees for a specific period of time in order to kill the bacteria that would spoil it.  A water bath canner cannot reach that temperature.

 -Jessica