Showing posts with label recipe. Show all posts

Monday, January 27, 2014

Homemade Liver Powder

I struggle with anemia.  Between my Crohn's Disease and having been pregnant and/or nursing for over seven consecutive years, my iron levels can get pretty low.  While pregnant I always experience a dip in my hemoglobin levels in the beginning of the third trimester, where I test around 8.0 (normal range for women is between 12.0-15.5 and slightly lower at 11.0 during pregnancy).  I've also had flare-ups of Crohn's Disease in which my anemia is so bad that they were considering blood transfusions.

Because of this problem, I've had to find ways to deal with my anemia through diet.  Traditional iron supplementation is not a good solution, as most iron supplements can make constipation even worse during pregnancy and are typically made up on non-heme iron that does not absorb well at all.  And if you have a child who is suffering from anemia, supplements can be dangerous because children often overdose on iron.  It really is best to focus on getting your iron through your diet and also making sure you aren't eating foods that leach the iron from your system or inhibit its absorption.

There are two forms of dietary iron - heme and non-heme.  Heme iron comes from animal-based sources that are full of hemoglobin, such as meat and fish.  Non-heme iron comes from plant-based sources like beans and fortified grains and is not absorbed as well into the body.  In fact, the reason that grains are fortified with things like iron is because the food itself, when improperly prepared, can actually leach iron from your body.

Besides avoiding grains and improperly prepared beans and legumes, when I'm dealing with anemia I also avoid black tea, which is full of tannins that decrease iron absorption (lighter teas, like white and green do not seem to have the same effect).  I also make sure not to eat any dairy or other calcium-rich food with my iron-rich foods.  Just making those small changes to my diet has increased my hemoglobin score four points in one month during pregnancy, without having to take an iron supplement.

I obviously also try to increase my heme iron intake.  During pregnancy, I follow a form of the Brewer Diet and try to eat iron-rich organ meat at least once a week, usually in the form of pastured beef liver.  The problem with this is that there are times during pregnancy where nausea makes stomaching the very potent smell and taste of the liver nearly impossible.  Because of this, it helps to get creative with your liver consumption.  One way to do that is to freeze your liver in small chunks and swallow them whole like a pill throughout the day.  If you're like me and have a strong gag reflex during pregnancy, that may not be the best solution.

Making your own iron pills is easy and a great solution to this problem.  People often use this process after pregnancy to encapsulate their placenta - dehydrate the meat, grind it down into a powder, and fill your empty gelatin capsules.

Here is how I did it with pastured beef liver (remember to only use pastured beef liver that is from a reputable source).  First, I cut the liver into thin strips, placed it on a cookie sheet, and baked it in the oven on the lowest setting possible (170) for approximately ten hours.  You do NOT want to put the iron in your dehydrator inside of the house, because the smell will be horrible and will take a really long time to air out.  Having it in the oven is also pretty noxious, but not nearly as bad as it would be in the dehydrator.  Within 24 hours the smell was gone in my kitchen when I dried it out in the oven.

Once your liver is dry, put it in the food processor until it is ground into a fine powder:


Next, take empty gelatin capsules and fill them with the powder.  For mine, I used these:


I was making these for my six-year-old son, who has a hard time with swallowing bigger pills.  If you're making these for an adult, you may want to use a larger size capsule.  These #3 capsules only hold up to 360 mg of the powder, while the 00 size can hold up to 1092 mg.

To fill them you just dump all of your powder into a bowl, take apart the capsule, scoop the powder into both ends and then put the capsule back together.  So simple!


If you're like me and you battle anemia, you can feel it coming on.  Whenever you're feeling a little run-down and irritable, just pop a handful of the capsules and let the liver do its magic.  Remember to store your pills in the fridge.

You can also skip the encapsulation step and use your powder in other ways - put some in your meatloaf or burger patties for an extra iron punch, or in any other casserole that will hide the liver flavor well.


I add a tablespoon to my smoothies.  1 Tablespoon liver powder, 2 cups of homemade raw yogurt, 1 tablespoon of raw local honey, 1 tablespoon homemade nut butter, some raw spinach, and a cup of frozen fruit - talk about a superfood with all of the nutrients, probiotics, digestive healing, and allergy help!


My kids usually do well with eating cooked liver, but a smoothie is one way to get a picky child to consume it without a fight and to make it feel like a treat!

 
-Jessica

Friday, August 23, 2013

Making and Preserving Homemade Chicken Broth

Note: People often use the terms stock and broth interchangeably. Essentially, they are the same thing - water flavored with bones, meat, and vegetables. The main difference is that broth is seasoned and stock is not. I like to flavor before preserving, therefore what I make is a broth, but if you were to leave out the flavoring, you could have a bland stock to season as needed with your recipes.

As I am reaching the height of my canning season, I am working on a series of posts about food preservation. I think the best place to start is with homemade stock.

Do you ever wonder what to do with the carcass after you roast a whole chicken? Making a bone stock or broth out of it is easy and saves you a ton of money. Throughout history bone broths have been known to have healing effects: mitigating cold symptoms, helping with inflammation, relieving digestive issues, and just giving us a sense of comfort when we're under the weather.

The most common brands of broth, like Swanson, are misleading in their advertising.  Many brands contain MSG, a neurotoxin, so Swanson wants us to know theirs is healthier and makes sure to label it as "all-natural" and "MSG-free".  The problem is that Swanson chicken broth contains yeast extract, which means the broth does in fact contain MSG.  It's a labeling trick that is dishonest.  To learn more about MSG and yeast extract, read this.

Buying a good, organic bone broth in the grocery store is difficult, not only because they are often seasoned with items you don't want, but they are pretty expensive.  Take Pacific Foods Free Range Organic Chicken Broth, which contains organic chicken broth (filtered water, organic chicken), organic chicken flavor, (organic chicken flavor, sea salt), natural chicken flavor (chicken stock, salt), organic evaporated cane juice, organic onion powder, turmeric, and organic flavor.  I don't know about you, but I have no idea what "organic flavor" is and I prefer that there isn't hidden sugar in my broth. Besides, for $4.00 per 32 ounces, I would at least like to see some veggies in the broth.

Instead of spending so much on nutritionally inferior broth, why not make your own out of something that costs you nothing extra, as you intend to throw the carcass in the garbage anyways?

All the equipment you need to make your own broth is a large stock pot, something to strain it with (like cheesecloth), and eight quart-size canning jars/lids.  I use my Cuisinart 12 Quart Pasta Pot because it allows me to throw all of my ingredients in the pasta insert and once the broth is done simmering I can pull the solids out without having to strain the broth through anything.

If you don't have a pasta insert, just throw your carcass, veggies, herbs, and seasonings straight into your stockpot and strain it when it is done.

Remember not to use a stock pot coated with Teflon or other non-stick coatings and additives.  It makes little sense to worry about your food additives while cooking with pots that contain carcinogens. 

MAKING THE BROTH
8 quarts filtered water
1 organic, free-range chicken carcass
3-4 organic carrots
3 organic green onions
2 cloves organic garlic
10-15 whole peppercorns
2 T sea salt

I do not add herbs now, because I prefer to add them directly to whatever food I am using the broth as a base for, but you could add some now if you want to - bay leaves or rosemary would be nice.

Bring the water to a boil and then let it simmer on the stove for about four hours.  If you have your solids directly in a stock pot you're going to want to stir it every now and then to make sure the veggies aren't sticking to the bottom.  If you're using the pasta insert it is not necessary.

After four hours you have a delicious broth that you can either preserve by freezing or canning, or put directly in the fridge, where it will last for about one week.  Freezing is a great option if you have the space for it, however, I prefer canning my broth so I don't waste precious space in my deep-freezer.

CANNING THE BROTH

To preserve your broth you are going to need a pressure canner.  I have a Presto 16 Quart canner and it is easy to use, although quite intimidating the first time.  If you've never used a pressure canner you may want to invite someone over to help you initially, as it is very different than using a water bath canner.

My canner fits 7 quart-size jars, and since I prepare 8 quarts of broth at once (1 inch of headspace), I leave one in the fridge for immediate use.  The rest go into the canner for 25 minutes at 10 psi.


And there you have it - 8 quarts of delicious homemade broth to use as a base in your soups and other meals.  Not only is it nutritionally superior to what you can buy in the store, but it saves you about $32 if you were buying the same quantity of organic broth there.

In case you're wondering, you CANNOT preserve broth with a water bath canner.  It is a low-acid food, which needs to reach 240 degrees for a specific period of time in order to kill the bacteria that would spoil it.  A water bath canner cannot reach that temperature.

 -Jessica

Thursday, August 15, 2013

Homemade Toothpaste

My husband and I went fluoride-free about six years ago when we started to learn about the potential dangers of ingesting it and the role it could have been playing in the flares of my Crohn's Disease.  We bought a reverse osmosis filtration system for our drinking water to eliminate all fluoride and began trying out different brands of fluoride-free toothpaste.  

I've tried countless different brands of toothpaste over the years and have enjoyed the flavors of some and the results of many, but the prices have been pretty outrageous.  Then when we started having children and needed to find a toothpaste that was safe for little ones to swallow we became even more frustrated. Not only were the fluoride-free toothpastes marketed to children overpriced, but they tasted terrible.  No wonder my children were protesting having their teeth brushed, because I nearly gagged the first time I tried their BabyGanics toothpaste!  It was like rubbing my teeth with a glob of artificially-sweetened strawberry goo.

If you do a search online for homemade toothpaste you'll find a million different recipes.  Different people like different tastes and formulas.  When I began putting together my recipe I knew I wanted every ingredient to be something I would actually eat (which meant no xylitol or glycerin) and something that would remineralise my mouth.

Our teeth are very porous and as we age, those pores become bigger from a loss of minerals, causing an increased risk of tooth decay.  It isn't that a poor diet high in sugar itself causes cavities, it's that the poor diet, low in vitamins and minerals and high in sugar, causes a loss of minerals and thus an increased risk of cavities.  Dr. Weston A. Price did a lot of research on this topic if you're ever interested in reading more about it.  Putting minerals into our mouths through our toothpaste is an important part of dental hygiene.

As I mentioned, there are a million different homemade toothpaste recipes out there.  This is what works for me.

1/4 cup Calcium & Magnesium pills crushed - for remineralisation

1/4 cup coconut oil - it's antimicrobial/antiseptic

2 T. baking soda - it's an abrasive that also neutralizes stains and odors

2 T. honey - helps preserve the toothpaste and gives it a good taste

1 T. filtered water - helps with texture

40-50 drops of essential oil - for flavor; I use peppermint

It's extremely simple to make.  I use my little bullet blender and throw in the pills with the coconut oil.  Once the pills are crushed a bit I add everything but the essential oils (you don't want your oils to get too hot) and then let it blend until it is a smooth paste.  After that is done I add my oil and do a quick mix.  When you're done you have something that looks like grey puddy.


The texture is not so thick that you couldn't put it in a hand-pump or some type of tube for easy application, however, I prefer to just scoop it into a half-pint canning jar and dip my toothbrush straight into it.  If you're a little more worried about germs, you might want to consider something else.


You don't have to worry about your toothpaste going bad.  The honey and coconut oil will help to prevent bacteria and if you only make the half-pint it will be gone quickly anyways.

Monday, December 10, 2012

Homemade Lotion Bars

Note: This recipe makes a very thick, greasy lotion.  This is something that is best used for seriously dry skin or skin conditions like eczema.  I prefer to use it at nighttime and I find that when I wake the next morning my skin still feels moisturized.  It's that thick!

You can find many different recipes for lotion bars.  Most include beeswax, a butter of some type (shea, cocoa, coconut, etc.), and oil.  After some experimentation, here is what I decided on for mine - Shea butter, Beeswax, Coconut Oil, Almond Oil, and Olive Oil.

Shea butter is pretty much a staple in my house during pregnancy.  I go through an 8 ounce container of it each month in an effort to prevent stretch marks and an itchy belly  (four pregnancies and no stretch marks, so it must do something helpful).  Aside from being a great moisturizer, in Africa where the butter is harvested, it is used as a sunblock and also as a massage oil for painful joints.  This makes it the perfect ingredient for lotion.

Shea butter can be pretty expensive if you buy it at your local health food store in a tiny jar.  It runs me nearly $10 for an 8 ounce jar.  But you can find great deals online in bulk.  For this project I found five pounds for $15 (plus shipping) on Amazon.

 Photobucket

Beeswax is obviously included in the recipe to help solidify the mixture.

Coconut Oil has many wonderful benefits for your skin - it can help protect you from infection, prevent aging, heal bruises, clear up rashes, and treat skin conditions like psoriasis and eczema.

Almond Oil is a great lubricant that also helps with skin conditions and can fight aging.

Olive Oil is great for dry skin and some scientists believe it can also protect your skin against sun damage and cancer.

 Photobucket

Once you have all of your ingredients, the process is very similar to making lip balm.  For my recipe I used 1 part shea butter, 1 part oil (1/2 coconut, 1/4 almond and 1/4 olive) and 1/2 part beeswax.  Most recipes call for equal amounts of each, but I wanted my lotion to be a little greasier and less solid.

Throw all of your ingredients into your double broiler and let them melt.

 Photobucket

Remember, it is much easier to melt the beeswax if it is grated, however, another way to speed up the process is to throw your solid chunk of wax on the heat for a while and once it softens, remove it and chop it into smaller chunks.

Photobucket

Once everything has melted you are are ready to fill your forms.

 Photobucket

If you prefer a scented lotion, now would be the time to add your essential oils - once everything is off of your heat source.  If you're using cocoa butter, it has a very chocolatey smell, and some essential oils aren't going to mix well with it.  Shea butter has a distinct smell that is very earthy.  I prefer to leave it unscented, but if you don't like the earthy scent, something like lavender oil would be nice.  Just remember that you DO NOT want to use citrus oils on a lotion that you will use before you head out into the sun.  Citrus oils are phototoxic and can burn your skin, leaving permanent dark patches.

Something to consider if you're thinking pretty far ahead of time is infusing your own oils with fragrance.  You could clip fresh herbs and flowers from your garden, or use your kitchen spices, and place them in a jar with the oil you plan to use for your lotion.  Put the jar in a window sill and let it sit for a few weeks to a month.  Calendula-infused oil would be great for eczema and other skin conditions.

Some people like to use silicon molds to create their lotion bars.  These are cute and can be placed in a small tin or jar for storage.  I prefer something that keeps my hands from getting too greasy when I apply it, so I purchased some empty deodorant containers.  These can be reused when I'm done with them.  To fill I used a ladle to get my hot mixture from the double broiler and into something with a spout.

Photobucket

If you're using deodorant containers and you want to use the dispenser tops that come with them, your recipe needs to have a high percentage of oil.  If it is too solid, your lotion will not squeeze through the holes and will just pop the top off.  If you're using them, make sure you don't fill the containers all the way to the top so you can still pop on the dispenser.

Photobucket

Photobucket

If you prefer to skip the dispenser top, you can fill to the top.

 Photobucket

Either way, the lotion bars are very easy to apply this way, leaving your hands grease-free.

 It's easy to apply on my son's eczema patches on his legs.

 Photobucket

And it's also great for my pregnant belly.

 Photobucket

If you want to give these as gifts, you can buy some shipping labels to add a cute touch.  Just make sure to cover your paper label with some clear shipping tape or else it will get really greasy or even start to peel off after a while.

Photobucket

Total cost per 2 ounce deodorant bar was approximately $2.50.  If I skipped the deodorant containers and just used recycled jars from around the house my cost would drop to about 90 cents per 2 ounces.  Not too bad!

Have fun experimenting!

-Jessica

Monday, November 12, 2012

Homemade Lip Balm

I suffer from terribly dry lips.  In the winter they crack and bleed and look just awful.  Unfortunately, my oldest son inherited my lovely dry skin and suffers from the same problem.  I've always settled for less than natural chapsticks for myself, but when my son started needing something to moisturize his little lips, I began a search for safer alternatives.

ChapStick brand lip balm is some seriously nasty stuff.  The original flavor even contains the controversial carcinogenic oxybenzone.  The full list of ingredients is:  arachidyl propionate, camphor, carnauba wax, cetyl alcohol, D&C red no. 6 barium lake, FD&C yellow no. 5 aluminum lake, fragrance, isopropyl lanolate, isopropyl myristate, lanolin, light mineral oil, methylparaben, octyldodecanol, oleyl alcohol, paraffin, phenyl trimethicone, propylparaben, titanium dioxide, white wax, propanol.

Gross!  I wouldn't eat any of that stuff or feed it to my kids, so why would I want to rub it on our lips, where it could potentially end up inside of our mouths?

Burt's Bees is a common "natural" brand that is a little better for you.  The ingredients for the beeswax lip balm are:  beeswax, coconut oil, sunflower seed oil, peppermint oil, lanolin, tocopherol, rosemary leaf extract, soybean oil, canola oil, and limonene.

These ingredients aren't horrible, but I know that the oils and extracts that companies like this use are not food-grade.  I wouldn't fry my eggs in the canola or soybean oil they use in this product, so I don't want to taste it on my lips.

I had finally found a great locally-made chapstick at our local bulk foods store, but the Amish man who made the stuff moved out of the area and it was no longer available.  After my son ruined my last tube of this wonderful stuff, I decided to look at the ingredients and see if it was something I could handle making myself.


I felt really silly for paying that $2.99 after taking a look at how simple it is - beeswax, coconut oil, honey and vanilla extract.

The beeswax is to help solidify the mixture.

The oil is obviously the moisturizer.  As you may know, I'm a huge fan of coconut oil for its nutritional benefits.  But coconut oil is also antimicrobial and anti-aging because of its high lauric acid content.  It's great for skin and can even help heal bruises and rashes.

The honey is what preserves the lip balm.  Not only does the honey taste good, but it will keep the mixture from molding.

The vanilla is for flavor, but you could use anything in its place.


For my balm I decided to use peppermint oil instead of vanilla.  I like the soothing and calming effect that peppermint seems to have on me.

My recipe:

10 T coconut oil
3 T beeswax
1 T honey
30ish drops of essential oil

I placed the coconut oil and beeswax in a double broiler and melted it down.  It would be much faster to grate or chop your beeswax.


Once everything melted I added my honey.  Make sure your honey completely mixes with the oil.  It's going to naturally want to separate, so it takes a little work to keep it mixed.

Once you take it off the stove, add your essential oils.  If you add the oil while it's on the heat you run the risk of breaking it down and losing the scent.

From here I filled my containers.  I prefer a lip balm that I can use my finger to apply, but my son needs it in a tube or we'll end up with grease everywhere.  You can order empty tubes online.

For this batch I filled empty lidded paint cups that I got at Hobby Lobby 12 for $2.99, so they end up costing a quarter each.  The great thing is that they can also be reused when I make my next batch.


I use one of my kids' medicine syringes to fill them.  Something like this is especially helpful for filling the tubes.


You want to make sure you stir your mixture before filling each container.

The recipe I posted above filled 15 of my containers.  I figured my cost to be a little over fifty cents each.  Why would I ever buy lip balm again??


This stuff is rich and creamy and really stays on your lips for a while (that is if you can keep from licking it off your lips - it tastes wonderful)!

These would make a wonderful Christmas gift for friends and coworkers.  You could even slap a cute mailing label around the container to dress it up a bit.


The total time to make these was less than twenty minutes and it was so easy my five year old could do it.  In fact, when his empty tubes arrive in the mail I plan on having him make his own batch (with a little supervision).

After this project I have realized just how much money you can save by making your own moisturizing products.  In the next week I plan to make some diaper rash cream, lotion bars, belly butter (to prevent stretch marks on my pregnant belly) and cream for my second child's eczema.  I'll make sure to share my results after some experimentation when I settle on recipes that work.

I think we know what everyone around me is getting for Christmas this year! :)

Tuesday, June 12, 2012

Homemade Banana Freezer Pops

I'm pregnant again.  And when I'm pregnant I crave popsicles.  It's also summer and my kids love the occasional popsicle treat on hot days.  I dislike giving them store-brought frozen treats because of the ingredients.  For example:


Popsicle brand cherry pop - water, high fructose corn syrup, corn syrup, sugar, contains 1 percent or less of each of the following: cherry juice (from concentrate), malic acid, citric acid, guar gum, vegetable juice (for color), natural flavor, locust bean gum, red 40.

Edy's fruit bar with real fruit (lime flavor)water, sugar, lime juice concentrate, citric acid, natural flavor, lime pulp, guar gum, carob bean gum, lime and lemon peel, ascorbic acid (vitamin c), lime oil, yellow 5, green 3.

I don't know about you, but guar gum (which has been known to cause gastrointestinal problems and can also decrease blood glucose levels), food dye (which has been linked to attention deficit disorder and other behavioral problems in children) and corn syrup/refined white sugar aren't part of the ideal summer snack for my children.

One of the most obvious and easiest ways to avoid the additives and preservatives in most store-bought popsicles is to freeze juice.  But that can get boring and every now and then you want a tastier treat to cool you down during the summer.

I came across an amazing popsicle recipe for dairy-free banana freezer pops in a cookbook and wanted to share it with you.


Here is how we made them:

  1. Pulse 4 organic bananas in a food processor.
  2. Add 12 ounces organic 100% orange juice concentrate, 1/2 cup filtered water, 2 tablespoons local/raw honey, and 2 teaspoons of organic alcohol-free vanilla extract; process in the food processor until smooth.
  3. Pour mixture evenly into cups.
  4. Add sticks and freeze.


No food dyes, "natural" flavors, or junky sugars to worry about - just a tasty fruit treat to cool the kids down on a hot summer afternoon.  They were a hit!


The bananas really give these freezer pops a nice thick texture, but in place of the orange juice concentrate you could add any type of frozen fruit.  


Enjoy!


-Jessica

Friday, June 18, 2010

Homemade Soft Tacos

We love Mexican food in our house.  But most of the ingredients you find in the grocery store are full of artificial preservatives and other additives. 

For example, an Old El Paso flour burrito contains the following ingredients:  Enriched Flour Bleached (Wheat Flour, Niacin, Iron, Thiamin Mononitrate, Riboflavin, Folic Acid) Water, Partially Hydrogenated Vegetable Oil (Soybean, Cottonseed) With Mono- and Diglycerides, Glycerin, Corn Syrup Solids, Salt, Baking Powder (Baking Soda, Corn Starch, Sodium Aluminum Sulfate, Calcium Sulfate, Monocalcium Phosphate), Potassium Sorbate and Calcium Propionate (Preservatives), Monoglycerides, Fumaric Acid, L-cysteine Hydrochloride.

Yuck!

What if you go to Taco Bell?  Their flour tortillas contain the following ingredients:  Enriched Bleached Wheat Flour (Flour, Malted Barley Flour, Niacin, Reduced Iron, Thiamine Mononitrate, Riboflavin, Folic Acid), Water, Soybean Oil, Hydrogenated Vegetable Oil (Contains One Or More Of The Following: Cottonseed Oil, Soybean Oil), with Mono- and Diglycerides, Sugar, Contains Less Than 2% Of The Following: Salt, Leavening (Sodium Acid Pyrophosphate, Sodium Bicarbonate), Fumaric Acid, Calcium Propionate and Potassium Sorbate (used as preservatives), Dough Conditioners (DATEM, Mono and Diglycerides, Enzymes).

All of that for a tortilla??

Then there are the taco seasonings and sauces.  Old El Paso Taco Seasoning contains: Maltodextrin, Salt, Chili Pepper, Onion Powder, Spice, Monosodium Glutamate, Modified Corn Starch, Yellow Corn Flour, Partially Hydrogenated Soybean Oil With Bht Added to Protect Flavor, Silicon Dioxide Added As Anti-caking Agent, Natural Flavor. 

Nothing like a healthy dose of MSG and trans fat for dinner!

Tacos are really easy to make on your own and can be really nutritious.  Here is how our family likes to eat them.


Tortillas
Organic Whole Wheat Flour
Water

Add water to the flour until you reach a dough-like texture.  You don't want it sticky.  Roll dough onto a flour surface into desired shape.

Cook on the stove on medium-to-high heat approximately 3 minutes on each side.

Some recipes call for baking powder, but I have made them both ways and don't see any difference when I use it.  If you're going to use baking powder, make sure it's non-GMO and aluminum-free.


Taco Seasoning
Paprika
Garlic Salt
Minced Onion
Salt
Pepper

Mix together for desired taste.  I use A LOT of paprika.  If you like it a little spicier, add some crushed red pepper to the mix. 

Meat
Pastured ground meat of any kind.  We used ground turkey tonight, but prefer beef.  Brown it and then sprinkle with your taco seasoning.  Add about 1/2 cup water and a tablespoon of raw honey to the bottom of the pan and let it all simmer for a few minutes.


Toppings
Add whatever raw, chopped veggies you have in the fridge.  We like to use carrots, celery, tomatoes, and greens and stir them directly into the meat mixture.

Tonight's other toppings were raw milk cheddar cheese, sour cream and salsa.

It's a quick, easy dinner that you can get your kids to eat, even when it's full of healthy vegetables.

Enjoy!

-Jessica

Friday, April 30, 2010

Homemade Soaked Granola Bars

Granola bars are considered a healthy snack by many people - they usually contain oats, nuts, dried fruits and other things that are good for you.  But most of the processed bars also contain a lot of things that are very bad for you.

Let's look at Nature Valley's 100% Natural Chewy Trail Mix - Fruit & Nut bars. 

Ingredients:  whole grain oats, high maltose corn syrup, rice flour, raisins, almonds, honey, sugar, roasted peanuts, fructose, sunflower seeds, canola oil, cranberries, maltodextrin, soy lecithin, salt, malt extract, baking soda, natural flavor, and mixed tocopherols.
That's EIGHT different sugars in one little granola bar.  Yikes!

What about something that is considered a little more healthy - Kashi's TLC Chewy Granola Bars Honey Almond Flax?

Ingredients:  rolled grain blend (hard red wheat, oats, rye, triticale, barley), roasted salted whole almonds, brown rice syrup, soy protein isolate, soy grits, evaporated cane juice crystals, chicory root fiber, whole flax seeds, evaporated cane juice syrup, rice starch, corn flour, honey, expeller pressed canola oil, vegetable glycerin, oat fiber, natural flavors, evaporated salt, Kashi seven whole grains sesame flour (whole: oats, hard red wheat, rye, brown rice, triticale, barley, buckwheat, sesame seeds), molasses, soy lecithin, peanut flour, whey protein isolate.

Only FIVE sugars in this one.

But the sugars aren't the only unhealthy thing about these "healthy" snacks.  They both use genetically modified ingredients, canola oil (at least Kashi's is expeller pressed), and those mysterious "natural flavors" that could include just about anything.

Your best bet is to make your own granola bars.  I found a wonderful recipe here that I decided to modify using soaked grains and nuts.  Remember that it is always important to soak your grains, nuts, legumes and beans before consuming them!

Here is how I made my chewy granola bars.  To make my recipe you will need a dehydrator.  I will also warn you that I didn't measure anything - you can't really mess this up, so just use as much as you want of each ingredient.

Step 1:  Soak some organic oats, raw almonds, and raw sunflower seeds for 12-24 hours.  The longer you soak, the better.

Step 2:  Drain and rinse your ingredients and then dehydrate them for a while.  I did it until the oats were half dry.


Step 3:  Pulse your almonds in the food processor.


Step 4:  Toss your oats, almonds, and seeds into a large mixing bowl.  Add your dried fruit - I used raisins and chopped dried figs.  Add your sweetener - I used raw, local honey


Add your fat - I used coconut oil so that my dairy-allergic son can eat them, but butter would also taste great.  Add anything else you want - I used cinnamon and flax meal. 


Step 5:  Mix.  Skip the spoon and just use your hands - it's much easier.


Step 6:  Put some wax paper on a flat surface and plop your ingredients on top.


Step 7:  Put another piece of wax paper over your ingredients and roll them until they are the desired thickness.  I like mine thicker.  Just remember that the thicker they are, the longer they will take to dehydrate.


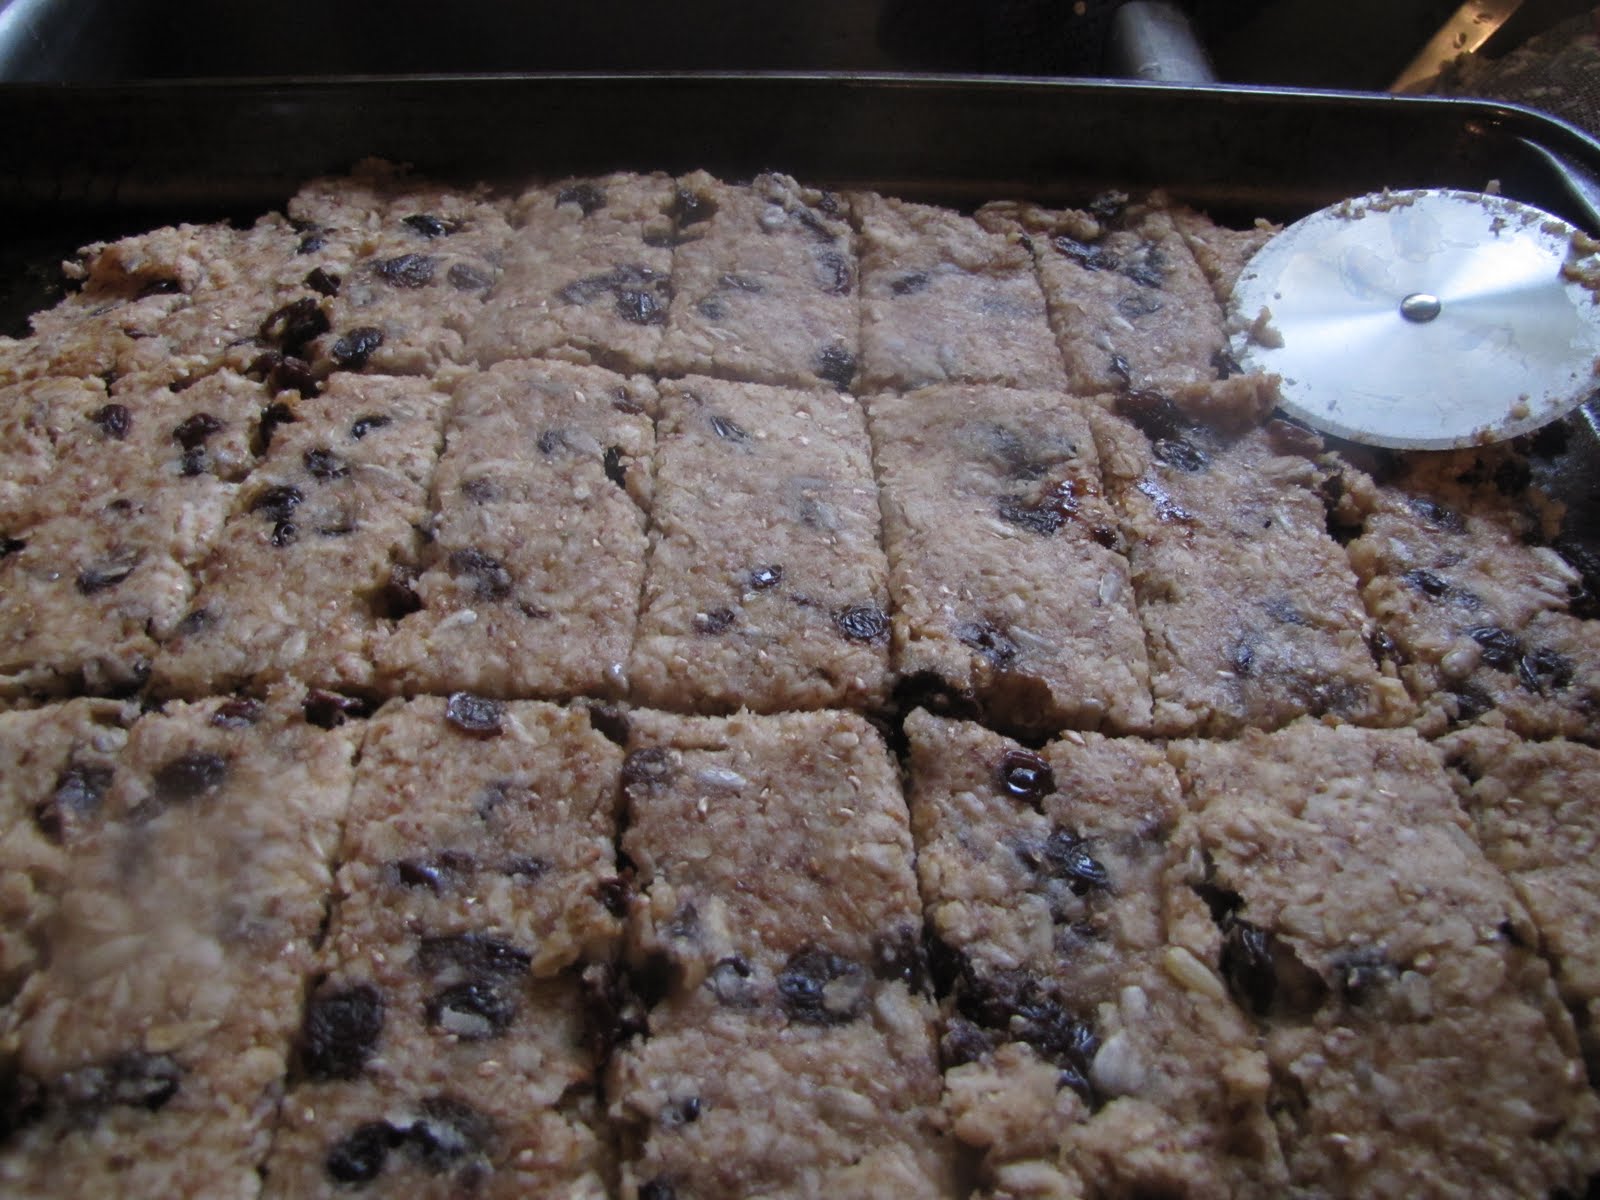
Step 8:  Peel off your top layer of paper and cut your bars with a pizza cutter.


Step 9:  Transfer your bars to the dehydrator and turn it on until they dry.  It took my really thick bars about 6 hours to completely dry today.


Step 10:  Enjoy!


Here is a picture of one of the thin ones for the children and the big, thick, Mommy-sized bars :)


It's as easy as that - a fresh, healthy snack for your family without all of the nasty additives, preservatives and sugars. 

-Jess

Monday, April 5, 2010

How To Make Homemade Mayo

If you're like me, you probably have a lot of Easter eggs left over from the holiday and you aren't really sure what to do with them.  Egg salad is always the obvious choice, but using mayonnaise is so unhealthy.  Here are the ingredients in common types of mayo and other salad dressings.

Hellman's Real Mayonnaise Ingredients: soybean oil, water, whole eggs and egg yolks, vinegar, salt, sugar, lemon juice, natural flavors, and calcium disodium EDTA.

Soybean oil is the worst type of oil for you.  Surely the types that contain olive oil are better for you, right?

Hellman's Olive Oil Mayonnaise Ingredients:  water, oils (soybean oil, extra virgin olive oil), vinegar, whole eggs and egg yolks, modified corn starch, sugar, salt, lemon juice, (sorbic acid, calcium disodium EDTA), xanthan gum, citric acid, natural flavors, oleoresin paprika, beta carotene.

What about salad dressings?

Miracle Whip Ingredients:  water, soybean oil, vinegar, high fructose corn syrup, sugar, modified food starch, eggs, salt, mustard flour, artificial color, potassium sorbate as a preservative, paprika, spice, natural flavor, dried garlic.

And the soy-free alternatives?


Hain's Safflower Mayonnaise Ingredients:  expeller pressed safflower oil, whole eggs, grain vinegar, water, egg yolks, sea salt, dehydrated cane juice, spice, lemon juice concentrate, honey, d-alpha-tocopheryl acetate (Vitamin E), rosemary extractives, natural flavor, paprika extractives.

They are full of sugar, emulsifiers, coloring agents, preservatives, and chelating agents, as well as the mysterious "natural flavors".  Yuck!  Calcium disodium EDTA has to regulated by the FDA to only be used in certain amounts, because it is a toxin.  Why would we want that in our food?

When making salads I like to make my own mayo.  This recipe tastes great in things like potato salad and egg salad, but does not spread well on sandwiches.


Homemade Blender Mayo

1 egg
2 T lemon juice or vinegar
2 t paprika
2 t dry mustard
2 t salt
2 t honey
1 cup extra virgin olive oil

Add all of the ingredients except the olive oil to a blender or food processor and start.  Slowly add the olive oil as the ingredients are blending.


Egg Salad Recipe

For my egg salad I doubled the recipe and used apple cider vinegar instead of lemon juice. 

Image and video hosting by TinyPic


Image and video hosting by TinyPic


Image and video hosting by TinyPic

Image and video hosting by TinyPic

Add your eggs.

Image and video hosting by TinyPic

Add chopped veggies and stir.

Image and video hosting by TinyPic

Serve on homemade sourdough bread.

Image and video hosting by TinyPic


Enjoy!

-Jess