Friday, August 23, 2013

Making and Preserving Homemade Chicken Broth

Note: People often use the terms stock and broth interchangeably. Essentially, they are the same thing - water flavored with bones, meat, and vegetables. The main difference is that broth is seasoned and stock is not. I like to flavor before preserving, therefore what I make is a broth, but if you were to leave out the flavoring, you could have a bland stock to season as needed with your recipes.

As I am reaching the height of my canning season, I am working on a series of posts about food preservation. I think the best place to start is with homemade stock.

Do you ever wonder what to do with the carcass after you roast a whole chicken? Making a bone stock or broth out of it is easy and saves you a ton of money. Throughout history bone broths have been known to have healing effects: mitigating cold symptoms, helping with inflammation, relieving digestive issues, and just giving us a sense of comfort when we're under the weather.

The most common brands of broth, like Swanson, are misleading in their advertising.  Many brands contain MSG, a neurotoxin, so Swanson wants us to know theirs is healthier and makes sure to label it as "all-natural" and "MSG-free".  The problem is that Swanson chicken broth contains yeast extract, which means the broth does in fact contain MSG.  It's a labeling trick that is dishonest.  To learn more about MSG and yeast extract, read this.

Buying a good, organic bone broth in the grocery store is difficult, not only because they are often seasoned with items you don't want, but they are pretty expensive.  Take Pacific Foods Free Range Organic Chicken Broth, which contains organic chicken broth (filtered water, organic chicken), organic chicken flavor, (organic chicken flavor, sea salt), natural chicken flavor (chicken stock, salt), organic evaporated cane juice, organic onion powder, turmeric, and organic flavor.  I don't know about you, but I have no idea what "organic flavor" is and I prefer that there isn't hidden sugar in my broth. Besides, for $4.00 per 32 ounces, I would at least like to see some veggies in the broth.

Instead of spending so much on nutritionally inferior broth, why not make your own out of something that costs you nothing extra, as you intend to throw the carcass in the garbage anyways?

All the equipment you need to make your own broth is a large stock pot, something to strain it with (like cheesecloth), and eight quart-size canning jars/lids.  I use my Cuisinart 12 Quart Pasta Pot because it allows me to throw all of my ingredients in the pasta insert and once the broth is done simmering I can pull the solids out without having to strain the broth through anything.

If you don't have a pasta insert, just throw your carcass, veggies, herbs, and seasonings straight into your stockpot and strain it when it is done.

Remember not to use a stock pot coated with Teflon or other non-stick coatings and additives.  It makes little sense to worry about your food additives while cooking with pots that contain carcinogens. 

MAKING THE BROTH
8 quarts filtered water
1 organic, free-range chicken carcass
3-4 organic carrots
3 organic green onions
2 cloves organic garlic
10-15 whole peppercorns
2 T sea salt

I do not add herbs now, because I prefer to add them directly to whatever food I am using the broth as a base for, but you could add some now if you want to - bay leaves or rosemary would be nice.

Bring the water to a boil and then let it simmer on the stove for about four hours.  If you have your solids directly in a stock pot you're going to want to stir it every now and then to make sure the veggies aren't sticking to the bottom.  If you're using the pasta insert it is not necessary.

After four hours you have a delicious broth that you can either preserve by freezing or canning, or put directly in the fridge, where it will last for about one week.  Freezing is a great option if you have the space for it, however, I prefer canning my broth so I don't waste precious space in my deep-freezer.

CANNING THE BROTH

To preserve your broth you are going to need a pressure canner.  I have a Presto 16 Quart canner and it is easy to use, although quite intimidating the first time.  If you've never used a pressure canner you may want to invite someone over to help you initially, as it is very different than using a water bath canner.

My canner fits 7 quart-size jars, and since I prepare 8 quarts of broth at once (1 inch of headspace), I leave one in the fridge for immediate use.  The rest go into the canner for 25 minutes at 10 psi.


And there you have it - 8 quarts of delicious homemade broth to use as a base in your soups and other meals.  Not only is it nutritionally superior to what you can buy in the store, but it saves you about $32 if you were buying the same quantity of organic broth there.

In case you're wondering, you CANNOT preserve broth with a water bath canner.  It is a low-acid food, which needs to reach 240 degrees for a specific period of time in order to kill the bacteria that would spoil it.  A water bath canner cannot reach that temperature.

 -Jessica

Thursday, August 15, 2013

Homemade Toothpaste

My husband and I went fluoride-free about six years ago when we started to learn about the potential dangers of ingesting it and the role it could have been playing in the flares of my Crohn's Disease.  We bought a reverse osmosis filtration system for our drinking water to eliminate all fluoride and began trying out different brands of fluoride-free toothpaste.  

I've tried countless different brands of toothpaste over the years and have enjoyed the flavors of some and the results of many, but the prices have been pretty outrageous.  Then when we started having children and needed to find a toothpaste that was safe for little ones to swallow we became even more frustrated. Not only were the fluoride-free toothpastes marketed to children overpriced, but they tasted terrible.  No wonder my children were protesting having their teeth brushed, because I nearly gagged the first time I tried their BabyGanics toothpaste!  It was like rubbing my teeth with a glob of artificially-sweetened strawberry goo.

If you do a search online for homemade toothpaste you'll find a million different recipes.  Different people like different tastes and formulas.  When I began putting together my recipe I knew I wanted every ingredient to be something I would actually eat (which meant no xylitol or glycerin) and something that would remineralise my mouth.

Our teeth are very porous and as we age, those pores become bigger from a loss of minerals, causing an increased risk of tooth decay.  It isn't that a poor diet high in sugar itself causes cavities, it's that the poor diet, low in vitamins and minerals and high in sugar, causes a loss of minerals and thus an increased risk of cavities.  Dr. Weston A. Price did a lot of research on this topic if you're ever interested in reading more about it.  Putting minerals into our mouths through our toothpaste is an important part of dental hygiene.

As I mentioned, there are a million different homemade toothpaste recipes out there.  This is what works for me.

1/4 cup Calcium & Magnesium pills crushed - for remineralisation

1/4 cup coconut oil - it's antimicrobial/antiseptic

2 T. baking soda - it's an abrasive that also neutralizes stains and odors

2 T. honey - helps preserve the toothpaste and gives it a good taste

1 T. filtered water - helps with texture

40-50 drops of essential oil - for flavor; I use peppermint

It's extremely simple to make.  I use my little bullet blender and throw in the pills with the coconut oil.  Once the pills are crushed a bit I add everything but the essential oils (you don't want your oils to get too hot) and then let it blend until it is a smooth paste.  After that is done I add my oil and do a quick mix.  When you're done you have something that looks like grey puddy.


The texture is not so thick that you couldn't put it in a hand-pump or some type of tube for easy application, however, I prefer to just scoop it into a half-pint canning jar and dip my toothbrush straight into it.  If you're a little more worried about germs, you might want to consider something else.


You don't have to worry about your toothpaste going bad.  The honey and coconut oil will help to prevent bacteria and if you only make the half-pint it will be gone quickly anyways.

Wednesday, August 14, 2013

LOTW - Arsenic in Chicken

Here is the link of the week: FDA Finally Admits Chicken Meat Contains Cancer-Causing Arsenic


Highlights of the article:


Arsenic has been added to chicken feed for the last sixty years and the poultry industry and FDA have said it does not end up in the meat.


The FDA is claiming that the levels of arsenic are too low to cause any harm, even though the chicken feed (manufactured by a subsidiary of Pfizer, of course) has now been pulled off the market in the United States. 


The poultry industry and FDA have known for years that chicken feces contains this arsenic.  That feces (chicken litter) is fed to cows that are factory raised, which of course contaminates the beef as well.


If you thought you needed yet another reason to avoid the meat sold in your supermarket, you now have it.  Buy locally-raised, pastured meat!

Monday, July 15, 2013

Homemade Sauerkraut

It's grilling season and my family loves a good steak or burger, but research tells us that cooking meat at high temperatures creates compounds that have been linked to cancer.  One way to clear your body quickly of those cancer-causing compounds is to make sure you eat some type of cruciferous veggie with your grilled meat.  These veggies contain sulforaphane, a molecule that helps fight cancer and microbes.

This makes sense, right?!  This is why a grilled bratwurst tastes so good slathered in sauerkraut.  It's the perfect combo for your health.

Sauerkraut is one of my husband's favorites.  I'm not a huge fan, but I tolerate the taste because I know it's good for you.  Besides being the perfect compliment for grilled meat, sauerkraut is great for digestion in general.  This is because of the lacto-fermentation process the cabbage goes through.

Many times, the sauerkraut you buy in the store has gone through a pasteurization process, which kills the good bacteria and negates these benefits to your digestive system.  To avoid this, why not make your own?  Sauerkraut is one of the easiest things to make and is really cheap.  You can get a fresh head of cabbage from the Farmer's Market for next to nothing, whereas a can of quality kraut at the store can cost you around $5.

To make my sauerkraut, I use nothing but sea salt and cabbage.  Many recipes call for homemade whey to give a little boost of Lactobacilli, but since we have a child with dairy allergies in the house that we want to share the sauerkraut with, we skip it.  Our kraut turns out just fine without it.

Here is how I make sauerkraut without a special crock.  Start with your cabbage.


Core and shred it.  Then add three tablespoons of sea salt (if you're using whey you use less salt - 1T salt/4T whey).


Now you start pounding.  I use a meat hammer and just beat and beat and beat at the cabbage until all of the juices are out of it.  It takes 10-15 minutes.  It's a good arm workout, which I guess is another health benefit of homemade kraut ;)


If you get tired, find some little helpers to beat it for you for a while.  It makes for a good science lesson. :)


Once you're done beating the cabbage, pack it into your canning jars.  For one medium head of cabbage I can usually get one quart plus one pint.  You want at least one inch of headspace and make sure all of the cabbage juice covers the cabbage in the jar.  In order to pack it in that way I use a large wooden spoon and press it down.

Make sure you completely seal your jars and place them on your counter to ferment for at least 3 days.  Once they are sealed, don't open the lid or you'll ruin the process. 

Here is my sauerkraut next to my sourdough starter.  That's a whole lot of fermentation going on!


After your three days you want to make sure to store your kraut somewhere cool.  You can use the fridge if you want.  I just put mine down in my basement food storage area with the rest of my canned goods.  You could technically eat your kraut after three days and you would get the benefit of the bacteria, however, sauerkraut is one of those things, like wine, that gets better with age, not just in terms of flavor. 

Remember that you don't need to use a water bath or pressure cooker to can your kraut.  In fact, the heat would kill the good bacteria.  The lactic acid preserves the cabbage, so you don't need to worry about bad bacteria until you open the lid.  Once it's open, make sure to store it in the fridge, where it will last for months.  And as with all home-canned items, check for signs of spoilage before you consume it.  If it looks like there is anything growing on your kraut or inside the jar on the top of the lid, if you see pink, or if there is seepage of some sort on the outside of the lid, it's better to be safe than sorry - don't eat it.

It is normal for your cabbage to lose it's bright green color with time.  That does not mean it is spoiling.  You'll notice that most krauts you buy in the store are more of a yellowish color than green.  Here is a batch of sauerkraut my husband made four years ago.  We will still eat it if it doesn't smell when we open it.


Cabbage is really cheap at this time of the year, so make sure to buy a few heads and start your own sauerkraut stockpile to get you through the winter.  Just make sure you buy organic cabbage that hasn't been sprayed!

Wednesday, June 19, 2013

I Love Bacteria

As someone living with Crohn's Disease, I am obsessed with bacteria (good and bad) and the role it plays in overall health.  While professionals in the world of alternative medicine have been screaming about this topic for decades, it seems that Western medicine is finally catching on.

An amazing article on the topic came out last month in The New York Times.  Written by Michael Pollan (author of some amazing books on food), the article titled "Some of My Best Friends Are Germs" talks about everything I've been trying to tell people ever since my diagnosis in 2006.  If you haven't read it yet, grab a glass of kombucha and settle in, because it's long, but extremely informative.

Basically, what Michael Pollan is trying to say is that our Western diets and medical model are horrible for the good bacteria in our body.  Antibiotic use, antibacterial obsessions, and processed foods DO have a negative impact on our bodies beyond antibiotic resistance and obesity. 

So, start eating those fermented prebiotic foods, stop worrying about cleaning your house, breastfeed those babies as long as you can, make sure you aren't accidentally eating antibiotics in your meat and dairy, and embrace the bacteria around you.  Life is dirty and sometimes that dirt is beautiful!

Monday, December 10, 2012

Homemade Lotion Bars

Note: This recipe makes a very thick, greasy lotion.  This is something that is best used for seriously dry skin or skin conditions like eczema.  I prefer to use it at nighttime and I find that when I wake the next morning my skin still feels moisturized.  It's that thick!

You can find many different recipes for lotion bars.  Most include beeswax, a butter of some type (shea, cocoa, coconut, etc.), and oil.  After some experimentation, here is what I decided on for mine - Shea butter, Beeswax, Coconut Oil, Almond Oil, and Olive Oil.

Shea butter is pretty much a staple in my house during pregnancy.  I go through an 8 ounce container of it each month in an effort to prevent stretch marks and an itchy belly  (four pregnancies and no stretch marks, so it must do something helpful).  Aside from being a great moisturizer, in Africa where the butter is harvested, it is used as a sunblock and also as a massage oil for painful joints.  This makes it the perfect ingredient for lotion.

Shea butter can be pretty expensive if you buy it at your local health food store in a tiny jar.  It runs me nearly $10 for an 8 ounce jar.  But you can find great deals online in bulk.  For this project I found five pounds for $15 (plus shipping) on Amazon.

 Photobucket

Beeswax is obviously included in the recipe to help solidify the mixture.

Coconut Oil has many wonderful benefits for your skin - it can help protect you from infection, prevent aging, heal bruises, clear up rashes, and treat skin conditions like psoriasis and eczema.

Almond Oil is a great lubricant that also helps with skin conditions and can fight aging.

Olive Oil is great for dry skin and some scientists believe it can also protect your skin against sun damage and cancer.

 Photobucket

Once you have all of your ingredients, the process is very similar to making lip balm.  For my recipe I used 1 part shea butter, 1 part oil (1/2 coconut, 1/4 almond and 1/4 olive) and 1/2 part beeswax.  Most recipes call for equal amounts of each, but I wanted my lotion to be a little greasier and less solid.

Throw all of your ingredients into your double broiler and let them melt.

 Photobucket

Remember, it is much easier to melt the beeswax if it is grated, however, another way to speed up the process is to throw your solid chunk of wax on the heat for a while and once it softens, remove it and chop it into smaller chunks.

Photobucket

Once everything has melted you are are ready to fill your forms.

 Photobucket

If you prefer a scented lotion, now would be the time to add your essential oils - once everything is off of your heat source.  If you're using cocoa butter, it has a very chocolatey smell, and some essential oils aren't going to mix well with it.  Shea butter has a distinct smell that is very earthy.  I prefer to leave it unscented, but if you don't like the earthy scent, something like lavender oil would be nice.  Just remember that you DO NOT want to use citrus oils on a lotion that you will use before you head out into the sun.  Citrus oils are phototoxic and can burn your skin, leaving permanent dark patches.

Something to consider if you're thinking pretty far ahead of time is infusing your own oils with fragrance.  You could clip fresh herbs and flowers from your garden, or use your kitchen spices, and place them in a jar with the oil you plan to use for your lotion.  Put the jar in a window sill and let it sit for a few weeks to a month.  Calendula-infused oil would be great for eczema and other skin conditions.

Some people like to use silicon molds to create their lotion bars.  These are cute and can be placed in a small tin or jar for storage.  I prefer something that keeps my hands from getting too greasy when I apply it, so I purchased some empty deodorant containers.  These can be reused when I'm done with them.  To fill I used a ladle to get my hot mixture from the double broiler and into something with a spout.

Photobucket

If you're using deodorant containers and you want to use the dispenser tops that come with them, your recipe needs to have a high percentage of oil.  If it is too solid, your lotion will not squeeze through the holes and will just pop the top off.  If you're using them, make sure you don't fill the containers all the way to the top so you can still pop on the dispenser.

Photobucket

Photobucket

If you prefer to skip the dispenser top, you can fill to the top.

 Photobucket

Either way, the lotion bars are very easy to apply this way, leaving your hands grease-free.

 It's easy to apply on my son's eczema patches on his legs.

 Photobucket

And it's also great for my pregnant belly.

 Photobucket

If you want to give these as gifts, you can buy some shipping labels to add a cute touch.  Just make sure to cover your paper label with some clear shipping tape or else it will get really greasy or even start to peel off after a while.

Photobucket

Total cost per 2 ounce deodorant bar was approximately $2.50.  If I skipped the deodorant containers and just used recycled jars from around the house my cost would drop to about 90 cents per 2 ounces.  Not too bad!

Have fun experimenting!

-Jessica

Monday, November 12, 2012

Homemade Lip Balm

I suffer from terribly dry lips.  In the winter they crack and bleed and look just awful.  Unfortunately, my oldest son inherited my lovely dry skin and suffers from the same problem.  I've always settled for less than natural chapsticks for myself, but when my son started needing something to moisturize his little lips, I began a search for safer alternatives.

ChapStick brand lip balm is some seriously nasty stuff.  The original flavor even contains the controversial carcinogenic oxybenzone.  The full list of ingredients is:  arachidyl propionate, camphor, carnauba wax, cetyl alcohol, D&C red no. 6 barium lake, FD&C yellow no. 5 aluminum lake, fragrance, isopropyl lanolate, isopropyl myristate, lanolin, light mineral oil, methylparaben, octyldodecanol, oleyl alcohol, paraffin, phenyl trimethicone, propylparaben, titanium dioxide, white wax, propanol.

Gross!  I wouldn't eat any of that stuff or feed it to my kids, so why would I want to rub it on our lips, where it could potentially end up inside of our mouths?

Burt's Bees is a common "natural" brand that is a little better for you.  The ingredients for the beeswax lip balm are:  beeswax, coconut oil, sunflower seed oil, peppermint oil, lanolin, tocopherol, rosemary leaf extract, soybean oil, canola oil, and limonene.

These ingredients aren't horrible, but I know that the oils and extracts that companies like this use are not food-grade.  I wouldn't fry my eggs in the canola or soybean oil they use in this product, so I don't want to taste it on my lips.

I had finally found a great locally-made chapstick at our local bulk foods store, but the Amish man who made the stuff moved out of the area and it was no longer available.  After my son ruined my last tube of this wonderful stuff, I decided to look at the ingredients and see if it was something I could handle making myself.


I felt really silly for paying that $2.99 after taking a look at how simple it is - beeswax, coconut oil, honey and vanilla extract.

The beeswax is to help solidify the mixture.

The oil is obviously the moisturizer.  As you may know, I'm a huge fan of coconut oil for its nutritional benefits.  But coconut oil is also antimicrobial and anti-aging because of its high lauric acid content.  It's great for skin and can even help heal bruises and rashes.

The honey is what preserves the lip balm.  Not only does the honey taste good, but it will keep the mixture from molding.

The vanilla is for flavor, but you could use anything in its place.


For my balm I decided to use peppermint oil instead of vanilla.  I like the soothing and calming effect that peppermint seems to have on me.

My recipe:

10 T coconut oil
3 T beeswax
1 T honey
30ish drops of essential oil

I placed the coconut oil and beeswax in a double broiler and melted it down.  It would be much faster to grate or chop your beeswax.


Once everything melted I added my honey.  Make sure your honey completely mixes with the oil.  It's going to naturally want to separate, so it takes a little work to keep it mixed.

Once you take it off the stove, add your essential oils.  If you add the oil while it's on the heat you run the risk of breaking it down and losing the scent.

From here I filled my containers.  I prefer a lip balm that I can use my finger to apply, but my son needs it in a tube or we'll end up with grease everywhere.  You can order empty tubes online.

For this batch I filled empty lidded paint cups that I got at Hobby Lobby 12 for $2.99, so they end up costing a quarter each.  The great thing is that they can also be reused when I make my next batch.


I use one of my kids' medicine syringes to fill them.  Something like this is especially helpful for filling the tubes.


You want to make sure you stir your mixture before filling each container.

The recipe I posted above filled 15 of my containers.  I figured my cost to be a little over fifty cents each.  Why would I ever buy lip balm again??


This stuff is rich and creamy and really stays on your lips for a while (that is if you can keep from licking it off your lips - it tastes wonderful)!

These would make a wonderful Christmas gift for friends and coworkers.  You could even slap a cute mailing label around the container to dress it up a bit.


The total time to make these was less than twenty minutes and it was so easy my five year old could do it.  In fact, when his empty tubes arrive in the mail I plan on having him make his own batch (with a little supervision).

After this project I have realized just how much money you can save by making your own moisturizing products.  In the next week I plan to make some diaper rash cream, lotion bars, belly butter (to prevent stretch marks on my pregnant belly) and cream for my second child's eczema.  I'll make sure to share my results after some experimentation when I settle on recipes that work.

I think we know what everyone around me is getting for Christmas this year! :)

Tuesday, June 12, 2012

Homemade Banana Freezer Pops

I'm pregnant again.  And when I'm pregnant I crave popsicles.  It's also summer and my kids love the occasional popsicle treat on hot days.  I dislike giving them store-brought frozen treats because of the ingredients.  For example:


Popsicle brand cherry pop - water, high fructose corn syrup, corn syrup, sugar, contains 1 percent or less of each of the following: cherry juice (from concentrate), malic acid, citric acid, guar gum, vegetable juice (for color), natural flavor, locust bean gum, red 40.

Edy's fruit bar with real fruit (lime flavor)water, sugar, lime juice concentrate, citric acid, natural flavor, lime pulp, guar gum, carob bean gum, lime and lemon peel, ascorbic acid (vitamin c), lime oil, yellow 5, green 3.

I don't know about you, but guar gum (which has been known to cause gastrointestinal problems and can also decrease blood glucose levels), food dye (which has been linked to attention deficit disorder and other behavioral problems in children) and corn syrup/refined white sugar aren't part of the ideal summer snack for my children.

One of the most obvious and easiest ways to avoid the additives and preservatives in most store-bought popsicles is to freeze juice.  But that can get boring and every now and then you want a tastier treat to cool you down during the summer.

I came across an amazing popsicle recipe for dairy-free banana freezer pops in a cookbook and wanted to share it with you.


Here is how we made them:

  1. Pulse 4 organic bananas in a food processor.
  2. Add 12 ounces organic 100% orange juice concentrate, 1/2 cup filtered water, 2 tablespoons local/raw honey, and 2 teaspoons of organic alcohol-free vanilla extract; process in the food processor until smooth.
  3. Pour mixture evenly into cups.
  4. Add sticks and freeze.


No food dyes, "natural" flavors, or junky sugars to worry about - just a tasty fruit treat to cool the kids down on a hot summer afternoon.  They were a hit!


The bananas really give these freezer pops a nice thick texture, but in place of the orange juice concentrate you could add any type of frozen fruit.  


Enjoy!


-Jessica

Saturday, May 19, 2012

Extended Breastfeeding Rant

I wrote this rant for my personal blog, but thought I would share it here too.  It seems appropriate for a blog about health, because I feel that breastfeeding is one of the most important decisions you can make for your baby's physical and emotional health.

I finally got around to reading the TIME attachment parenting (AP) article today.  I knew better, but did it anyways.  I've been hearing nothing but negativity about the cover and parenting philosophy for over a week now, so I should have known that the article would portray these mothers negatively.


At first glance I disliked the picture.  Not because I thought it was "pornographic" or "disgusting", as I've heard it described to me, but I thought it was the wrong choice for an article about this type of parenting philosophy (one that is about nurture and comfort).  I've met some very militant AP moms that have made me roll my eyes HARD before and I feel like this picture (camo and all) just catered to that stereotype.  If the author's intention was to help people understand these types of choices, this wasn't the picture to do it.  But of course, I know now that it wasn't the author's intention to portray these mothers positively.


After a week of hearing negativity, I now love the picture.  It's sort of how I feel about extended breastfeeding in general after hearing comments from the peanut gallery - the more you try to make me feel like a pervert for feeding my child naturally, the more I want to whip my boob out in public just to upset you.  In this respect, the picture is perfect.  The mom is beautiful and fierce, and you know what?  She doesn't give a darn what you think about it.  Take that, America!


I nursed David until 18 months and would have gone longer if my milk hadn't dried up with the pregnancy.  Grace is still nursing at 14.5 months and my plan is to let her self wean.  If she wants to nurse until she's four and I still have milk then, she can have it.  That's why God gave me boobs and there is nothing wrong with using them in a way that gives my child comfort.  I could rattle off a bunch of Scripture to support this notion right now, but I'll spare you.  Just remember that Hannah nursed Samuel well into toddlerhood (most people think around age four).  I have a feeling Jesus was nursing as a toddler too.  Hmmmmmmm.


This all got me thinking about why America is so messed up.  People blame our Puritanical background for our messed up relationship with breasts.  I don't think that's all of it.  I bet the Puritans were nursing their toddlers.  In fact, you find a lot of orthodox religious communities (not just Christians) that support nursing.  Of course you find some that don't, but that's the case in any culture.  I mean, Muslim women who aren't even allowed to expose their face are allowed to nurse their children in public.  A culture that goes to the extreme to deny female sexuality recognizes that the act of nursing is non-sexual, yet a culture like ours that goes to every extreme to expose female sexuality can't tell the difference.  My head wants to explode.


No, America's twisted ideas about nursing have nothing to do with religion.  I believe it has everything to do with the way we view children.  We live in a culture that expects children to grow up WAY too soon.  We're pressured into teaching our kids to read before they can walk well.  Just browse the local Babies-R-Us and look at the amount of junk being marketed to us as necessary for proper brain development.  Everything is about education and preparing them to learn the facts necessary to become smart, successful adults.  Doctors even suggest to mothers that they put their child in daycare so that they learn how to stand on their own and become properly socialized as preschoolers (because obviously a mother can't teach their child that on her own).  True story - I know someone whose doctor said that.


Childhood in its natural sense is gone.


Sure, our culture supports providing our children with all of the toys, tools, and time necessary to have a great childhood, but none of that really has anything to do with being a kid.  The expectation is that our kids should act like mini-adults and be socialized into adult society as early as possible.  You need to learn to stand in line at age two, Jimmy, or else you'll never learn to do it on your own naturally.  Sit in that chair for five hours a day learning, Sally, or you won't be prepared for gainful employment one day.  Naps are for the weak, Buddy, it's time to start being a big boy.  And get rid of that blankie that gives you comfort or the kids will make fun of you at recess.  No more hugging or kissing Mommy on the lips, even if you want to, because that would be pervy.  It's time to start acting like adults, children.


When you have a culture that expects children to stand on their own at a young age, of course it seems disgusting and pornographic for them to be suckling their mother's breast at age three.  Three-year-olds aren't babies, after all.  They aren't SUPPOSED to be at home with their mothers learning about life through natural nurturing and family experiences.  They are SUPPOSED to be with their peers, learning structured play and socialization.  And since they are mini-adults, they obviously know that boobs are for sex and not food.  It's going to scar them for life if they nurse that long.


The most ironic thing about all of this (it would be really funny if it weren't so sad) is that our culture wants our children to grow up so fast in almost every way imaginable, except for when it comes to responsibility.  We've created this new stage of life called "adolescence" that never existed prior to the mid-20th century and that basically gives our "young adults" all of the freedom of adulthood without any of the responsibility.  Let's face it, our children in America are still children well into their twenties in many cases.  They're just trained to think that they aren't.


All of this is so opposite of the way life used to be or the way it naturally evolves in most of other cultures around the world (or even the way our bodies are naturally designed).  In most cultures children are viewed as children much longer.  A three year old nursing is no big deal because a three year old is still a child.  And then around puberty, when the body is mature, the child is expected to "put away childish things" and become an adult.  You see these rites of passage into man or womanhood around age 13-14 in most cultures around the world.  You're no longer a child, so you start acting like it.


In these cultures that grant adulthood during puberty, it seems like they actually hand over much earlier the one key to adulthood that we withhold.  Their kids have the responsibility of an adult BEFORE puberty, often having to care for smaller siblings, help work to support the family, or cook meals.  It's the complete opposite of what we do.


So I guess my point to all of this is that I feel we're approaching this wrong.  The reason why people think breastfeeding a toddler is gross isn't just because of our relationship with breasts as purely sex objects.  I think it has just as much to do with the idea that the natural evolution of childhood isn't being allowed to play out.  We're disrupting the flow.  Lactivists' efforts to change the way we view breasts are going to be in vain so long as we keep the same approach to childhood.


I co-sleep with my babies.  Actually, I bed-share.  Grace still wakes up next to me every morning.  I like to "wear" my babies in carriers and wraps.  I'll even throw my three or four year old in the Ergo when they are sick and want some snuggles.  I breastfeed my toddlers.  If they needed/wanted to and knew how to do it, I would breastfeed my older boys too.  I make a lot of choices that these AP moms make (selective vaccination, avoiding crying it out, nursing on demand, using the nipple as a pacifier, delaying solid foods, etc.).  I don't do them because some study shows me that it will help my child's brain development and make them smarter,  and I don't do it because some psychologist tells me it will keep them from being an axe murderer when they are older.  I do it because it feels right to me.  It's what my mothering instincts tell me to do.


I'll do what works for me and you do what works for you.


And as you can see, most other cultures aren't sexualizing the act.  So you tell me - who's the REAL pervert?


-Jessica


Thursday, March 15, 2012

Fish Safety

I believe that human beings were meant to consume large amounts of fish and other seafood, considering that it is one of the best sources of many of the essential vitamins and minerals.  Fish is one of the few foods on earth that requires little (if any) work on the part of humans to grow and is abundant pretty much anywhere (minus the desert, of course). 

The problem is that modern life has contaminated many of the world's bodies of water, leaving the fish living there unsafe for human consumption.  The main source of contamination that people are aware of in seafood is mercury, but that is only one concern.  Many other toxins are common, including: flame retardants, PCBs, chlorinated dioxins, pesticides, oil, arsenic and melamine, just to name a few.  These toxins are either present in the water in which the fish live, or in the food they are given.

Living in Ohio, there are many streams and lakes nearby for fishing, but after speaking with an ichthyologist at a local university who has tested toxicity, I don't feel safe eating anything that lives in them.*  Since I try very hard to only eat local and ethically-raised meat sources, this leaves me with very few options.

But as the mother of a dairy-allergic child, I realize how important the calcium and vitamin D that seafood provides is for my son.  His options for foods high in these two nutrients are more limited simply because he cannot drink milk.

I have found that the Environmental Defense Fund has some excellent resources for seafood safety.

Here is a complete list of Seafood Eco-Ratings.  According to this chart, you shouldn't consume any of the following items due to high mercury or PCB content:

All bluefish
Chilean sea bass
Blue crab
Summer flounder
All lingcod
All marlin
All opah
All orange roughy
Yellow Perch from Lakes Huron and Ontario
All rockfish
All salmon (except wild Alaskan)
Mutton snapper
Summer flounder
Atlantic sturgeon
Imported wild sturgeon
All swordfish
All tilefish
Canned white/albacore tuna
Bluefin tuna
All wahoo
All walleye

Some people choose to take a fish oil supplement in order to get their nutrients.  The Environmental Defense Fund also has a list of the safest supplements to take.  Never take the following brands of fish oil:

Kmart brand
Omega Protein
Rite Aid
Solaray

To learn about the best sushi choices (both for your health and the environment) check out this list.

So it looks like for me and my family, with a very limited selection of seafood in the grocery store, our safest bet is to stick with wild Alaskan salmon, shrimp from Oregon, U.S. tilapia, and U.S. or Canada albacore tuna. 

-Jessica

* Except for the fish from one river about 45 minutes away that he said had been tested as clean.  This stream runs from a mountain at a high elevation and if you catch fish from higher up, they are less toxic.  This ichthyologist said that is a good rule of thumb for eating fish that you have caught - the higher the elevation (so long as it is upstream from any potential pollution sources), the safer the fish.

Source - Environmental Defense Fund.   http://www.edf.org/


I'm Back

Hello, everyone!  It has been a while since I've posted on this blog.  If you aren't a follower of my personal blog you're probably not aware of what has happened in my family since I was posting frequently over here.

Around the time that I stopped posting (May/June 2010) I became pregnant with our third child.  Between morning sickness, caring for two energetic little boys, and everything else, this blog sort of got put on the back burner.  I had a wonderful pregnancy with Gracie (our little girl born one year ago last Friday) under the care of some great midwives.  Gracie was my first homebirth and I learned a lot about my body and a more holistic, natural approach to pregnancy and childbirth during the process.  I followed a very strict diet, provided by my midwives, during the pregnancy that I hope to share with anyone interested.

Since I was posting here frequently my husband, Adam, also decided to have a back surgery to correct some of the sources of his chronic pain.  Over the last five to seven years he has tried everything - chiropractic care, stretching, diet, exercise, inversion tables, special shoes, etc. - to alleviate his pain, but in the spring of 2011 it became too much to handle and surgery was necessary.  I am happy to report that he is now about nine to ten months out from the surgery and many of the pain issues have since resolved.  He still isn't at one hundred percent, but we keep praying that relief will eventually come.

After everything that has happened in our lives over the last few years, I finally feel like I have a handle on life with three children and can prioritize my time to return to sharing what we are learning about our health and wellness.  I feel like we have grown a lot in the last two years and have a lot of information to share!

-Jessica

Friday, June 10, 2011

Is Eating Organic Really Expensive?

We live in a culture that expects food to be cheap.  REALLY cheap.  Shows like Extreme Couponing now have shoppers obsessed with getting the best deals on what they feed their families, but the problem is that you can rarely find a coupon for anything that is actually good for you.  Because of this, people say that eating organic is just not affordable for the average family.  I beg to differ. 

Here are some of the statements people make that I find to be completely untrue.

Eating organic is too expensive for the average American family.

People tell us all the time that they want to eat the way we eat, but they just can't afford it.  I wish they knew that we spend the same amount on organic food as they do on their grocery shopping, we just put a lot of effort into it.  If people are willing to spend hours a week looking online for deals and clipping coupons, they could instead be spending that time preparing food at home, taking care of a garden, and saving money on healthy foods.

Here are some examples of the foods we eat that are just as cheap, if not cheaper, than comparable items you find at the grocery store:
  • Oatmeal - If I go to our local megatore (Meijer) and purchase the store brand 2 lb. 10 oz. container of old-fashioned oats, I spend $3.59 .  Instead, I go to a local health food store that sells bulk grains for 99 cents per pound.  If I were to buy the same amount there (2 lb. 10 oz.) I would only spend $2.52 - that's for organic, non-GMO old-fashioned oats.  THE ORGANIC OATMEAL IS CHEAPER.
  • Chicken - If I go to our locally owned grocery store and purchase chicken breasts for dinner, I am going to pay $5.39/lb.  That is for non-organic chicken that was raised in living conditions that would make the average consumer sick to their stomach.  Instead, I drive to a local farm and get true free-range, organic chicken for $3/lb.  The difference is that the organic chicken is sold whole, so it takes a little more work to prepare it for dinner.  The bonus is that if I roast the chicken whole, I can use the leftover carcass to make my own chicken broth for free (it would cost me $4.29 for that amount of organic broth at Meijer).  THE ORGANIC, FREE-RANGE CHICKEN IS CHEAPER.
  • Eggs - At our local grocery store, a dozen regular non-organic eggs can cost $2.46/dozen (Eggland's Best), but a local farm sells truly organic, cage-free eggs for $2.50/dozen.   THE ORGANIC, CAGE-FREE EGGS COST THE SAME.
  • Milk - I haven't even looked at the milk in the grocery store for so long that I don't know what the average gallon costs (I'm assuming $3/gallon), but I do know that organic milk in the grocery store used to cost well over $4/gallon.  It costs me $3/gallon at our local farm for raw, organic milk from cows that were fed on pasture.  THE ORGANIC MILK COSTS THE SAME.
  • Yogurt - At our local grocery store, a large container of non-organic, plain Greek yogurt costs $5.49.  I take half of the milk we buy and make our own yogurt, so it costs roughly $1.50.  THE ORGANIC YOGURT IS CHEAPER.
  • Jam/Jelly - If you were to buy an 8 oz. jar of Smucker's jelly at the grocery store, you would pay roughly $2.  Organic jams and jellies range from $4 -$7 per jar.  I can buy locally grown strawberries ($14/4 quarts) and organic, free-trade sugar from the store ($4.59/2 pounds) and make my own jam for approximately $1.76 per 8 oz. jar.  THE ORGANIC JAM IS CHEAPER.
  •  Beef - I don't know what grocery store beef costs, because I haven't eaten it in a while, but I do know that my pastured, organic beef is cheaper.  We spend $1200 every January for a half beef ($700 for the meat and $500 for butchering costs).  That amount of beef will last four of us nine months (we eat red meat five days a week).  If you do the math, we spend $6 per meal (that's $1.50 per person) on our beef. THE PASTURED, ORGANIC BEEF IS CHEAPER.
  • Bread - At our local grocery store I would have to pay $4.99 for a loaf of organic bread.  Instead, I can buy flour for $3.99 (that will make 5 loaves) and yeast for $3.19 (that will make 10 loaves).  If I factor in $1 for extra costs (tablespoons of butter, sugar, honey, etc.), I can make a loaf of healthy, organic bread for $2.12.  That's even cheaper than the junky white bread at the grocery store.  THE ORGANIC BREAD IS CHEAPER
  • Produce - I know that grocery prices range depending on the season and availability, so this is a hard one to gauge.  Our CSA costs us $25 per week for a bushel of produce (plus $2 for a pint of local honey per month).  Our first bushel contained two different types of lettuce, mint, radishes, green onions, and other herbs.  Just one large container of Wild Harvest Organic Lettuce at the store costs $5.99, so we definitely save money with the CSA.  Green beans cost me $1.50 per meal from Meijer right now ($1.05/pound), but my tiny garden will grow enough to feed us green beans twice a week for two months out of the summer.  If we eat only in season, shop at Farmer's Markets, and preserve excess for the winter months, THE ORGANIC COSTS THE SAME.
You get the picture.  I could keep going with this list, but the bottom line is  - EATING ORGANIC DOESN'T HAVE TO BE EXPENSIVE.  But it is going to be work and you have to sacrifice eating your favorite foods anytime you want. 

But that's still too expensive.

Get out of the grocery store.  When you shop there you are paying for convenience and advertising, and with that convenience there is also an added price - additives and preservatives to make the food shelf stable and which take a toll on your body and the Earth.  Go directly to the source of your food and buy in bulk if you want to save money.  Don't get caught in the green-washing trap in the grocery stores.

Eating organic is a lifestyle choice.  When someone decides to eat this way they are usually saying that they don't feel comfortable feeding their family pesticides, antibiotics, chemicals, or inhumanely raised animal products.  They may worry about the environmental implications of it all.  This is why you usually find that families who eat organic food also make other similar lifestyle choices, like cloth diapering, green cleaning, no-poo, etc.  It makes little sense to worry about chemicals in the foods you eat, but then fill your environment with them through the use of toxic cleaners, candles, air fresheners, and cosmetics. 

You can save lots of money by making other "green" lifestyle changes.  For example, cloth diapering saves my family over $800 per year.  That's an extra $67 per month for groceries.  We don't but expensive, conventional cleaning products or even the "green washed" eco-friendly versions in the store.  Vinegar and baking soda can handle all of your household cleaning and clear space in your budget for food.

Cosmetics are the worst.  Families spend insane amounts of money on these items and they are full of chemicals that are just being absorbed through your skin, instead of through your digestive system.  If you're going to cut it out of your food for your family's health, get it out of your bathroom too.  It will save you more money.

If you're uncomfortable with going no-poo or ditching your deodorant, there are other ways to save money.  Ditch your cable (you'll need to free up time in your schedule for your garden anyways).  Without cable there really isn't a reason for a new fancy television, so why not spend that $1000 on some pastured meat for the upcoming year.  Then you can set aside the money you would have spent on meat during your grocery shopping for organic produce.

Aside from the extra money you will have from ridding your shopping list of this stuff, you will also benefit from lower healthcare costs.  Eating good food and avoiding toxins can keep you from getting sick.  Less money spent at the doctor or pharmacy means more money for good food.

The best way to make room for organic food in your grocery budget is to change your eating habits.  Processed organic foods are EXPENSIVE.  If you try to eat from boxed organic food you're going to spend over double what you would on conventional groceries.  You have to change the way you eat.  Instead of giving your children cookies and crackers for snacks, give them some veggies from your garden.  Ditch the juice that isn't good for them anways and give them water in their sippy cups.  They may resisit you at first, but eventually they too will change their eating habits.

Also, think about how much food you waste.  If you add up all of the money spent on the food thrown away from plates that were overfilled, leftovers that don't get eaten, or food that has expired, you realize that there is a lot of room for savings if you just use what you already have.

But I live in a city.

There are farmer's markets everywhere.  You can also drive to get to a farm.  I know many people who are willing to travel an hour to get to a desirable mall to buy a new outfit.  Isn't your food just as important?

If you don't want to travel, you can grow a container garden on your patio or even plant a rooftop garden.  Urban gardening is becoming very popular and there are tons of resources out there to help you learn.

Some families have built self-sufficient homesteads in the middle of the city!

But I don't have the time to do all of that work.

Once again, it's a lifestyle choice.  You can spend your evenings watching television or clipping coupons, or you can use it to bake some bread or care for a garden.  If eating organic food is a priority, you can always find the time for it.

If you involve your children in the work, it stops feeling like chores and it becomes a family lesson in health.  When you teach your children where their food really comes from, they learn to respect it and become conscious of what they are putting in their bodies.  Making yogurt or sourdough bread can become a science lesson for children, as they learn how fermentation works.  Sprouting grains or planting seeds becomes an experiment for a child.  Baking bread becomes a lesson in math as you measure ingredients.  Children love to be involved.

We take our children to the farms to pick up our groceries and the farmers are always willing to let us roam around.  My kids have gotten to play with baby pigs, chase chickens, pet the cows, and interact with the animals that will one day become their food.  Who needs a zoo membership when you get to enjoy a free petting zoo every week?  Plus, your children learn to respect and not to waste the food they are eating, because they may have been playing with that chicken before it became part of their soup.

If you look at your life and decide that the lifestyle changes necessary to afford organic food aren't something you're willing to do, I completely understand.  It's hard work and very time consuming.  Just remember that the "organic food is too expensive for the average family" line just isn't true!

Sunday, July 11, 2010

Links of the Week

Here are some health-related links that I came across this week:

Another McNeil Product Recall from July 8, 2010 for Benadryl, Tylenol, and Motrin.  This is the third recall from this company for various reasons since January of this year.  We will no longer be buying these brands in our house.

Why You Don't Want to Buy Organic Eggs at the Grocery Store – Part 1 by Dr. Joseph Mercola - June 9, 2010

Why You Don't Want to Buy Organic Eggs at the Grocery Store - Part 2 by Dr. Joseph Mercola - June 10, 2010

More doctors coming out against the 2010 Dietary Guidelines - June 28, 2010

Saturday, July 3, 2010

How To Make Raw Almond Milk

Step 1Soak your almonds for at least 24 hours prior to making your milk. 


For a nutritional boost, use sprouted almonds.

Step 2:  Rinse your almonds and then put them in the blender with filtered water.  For every cup of almonds, add three cups of water. 


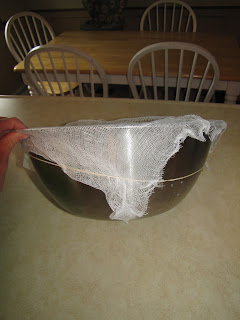
Step 3:  Put a large piece of cheesecloth over a bowl and secure with a rubber band.  Slowly pour your almond milk into the bowl to filter the chunks of almonds.


Step 4:  Squeeze the milk from the cheesecloth and set aside your almond leftovers.


Step 5:  If you want to do another filtering, a coffee liner in your funnel works well (but takes a while to filter).


Step 6:  If you're lazy like me, and don't mind a few small chunks, just ladle the milk directly into your containers.


Step 7:  Make sure to add a pinch of salt to each container before you seal them up, which will help to preserve the milk (mine lasted 4-5 days).  You can taste it when it starts to go sour. 

Chill the milk in your fridge before serving.

One pound of raw almonds yielded this much milk and almond pulp:


In the future, I will not make quite as much, because it is hard to use up so much milk before it spoils.

I used my pulp to make two batches of homemade granola bars.


If you're planning to drink the almond milk as a milk substitute, you may want to flavor it with some vanilla or warm it up with some honey.  It has a very bland, nutty taste without any extra flavoring.

You can also add a liquid calcium supplement and probiotic powder to make it a more nutritious milk substitute for people with milk allergies.

My boys and I enjoyed the milk in a smoothie.  Yum!


Enjoy!

-Jessica